Risk Assessment and Mitigation
Learn about risk assessment and mitigation for labs.
Risk assessment and mitigation is essential for managing risks in laboratory settings, aligning with both California and federal safety regulations. The University’s Integrated Safety and Environmental Management (ISEM) process forms the foundation for this framework, ensuring health, safety, and environmental standards are upheld. The five-step risk mitigation process, derived from authoritative bodies like Cal/OSHA and the CDC, emphasizes continuous assessment and control of hazards. By identifying, evaluating, and mitigating risks, the process helps laboratories prioritize safety and effectively reduce potential hazards (e.g., hazardous materials and equipment, job tasks, etc.).
The Risk Management Process contains five critical steps and is a continuous process for an ever-changing research environment. The purpose of this process is to mitigate risks inherent in research activities:
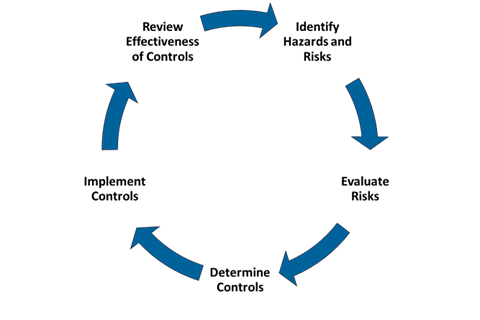
Figure 1: Risk Mitigation Process
Source: CDC
Risk assessments begin with identifying hazards (Step 1) and continue with evaluating the associated risks (Step 2) as part of the overall Risk Mitigation Process (See Figure 1). This approach helps ensure safety by proactively addressing potential dangers before starting work.
Step 1: Identify Hazards and Risks
Personnel working with materials must be aware of the hazards they use in the workplace. Hazards are identified by looking at the safety data sheets, publications, Laboratory Hazard Assessment Tool (LHAT), and Hazard Control Plans (HCPs).
Prior to the start of work, researchers must be knowledgeable of the following:
- What materials or hazardous processes are being worked with?
- Where and how is the work occurring?
- Who is involved in the work?
- What can go wrong?
This is the starting point for conducting a risk assessment and developing a risk mitigation plan.
The CDC has a useful tool for more in-depth risk assessment guidance.
For UC San Diego risk assessment guidance, refer to the Chemical Hygiene Plan and Biosafety Manual. The LHAT is an additional tool that documents a hazard assessment.
Specific hazards may require additional risk assessments and institutional oversight. For institutional oversight requirements, refer to Research Safety Authorizations for Principal Investigators (for example, Biological Use Authorization, Radiation Use Authorization, Controlled Substance Use Authorization, Laser Use Authorization, and Machine Use Authorization).
Step 2: Evaluate Risks
Now that the hazards are identified, let’s evaluate the risks associated with the hazard.
Multiple factors must be considered to evaluate the risks. These include:
- The types of materials
- The procedures
- The work environment
- The human element
- The likelihood of the risk occurring
- The potential severity of consequences for the individual, community, or environment
Identify the material-specific risk factors, such as hazard classification, personnel knowledge, skills, and abilities, and environment or procedural settings.
Below are some criteria based on each risk factor for labs to consider (Figure 2).
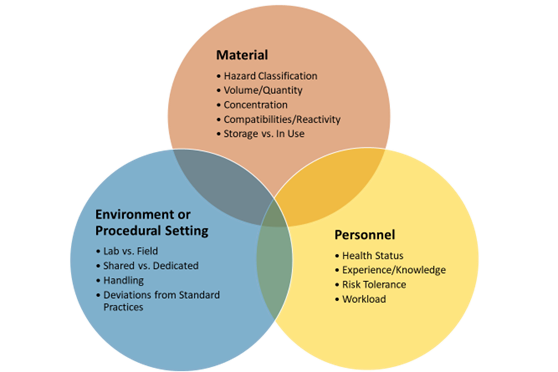
Figure 2: Potential Risk Factors
Once the risk factors are identified, the risk matrix table helps determine the overall risk level. This is calculated by comparing the likelihood against the impact. Refer to Table 1. Risk Matrix Table.
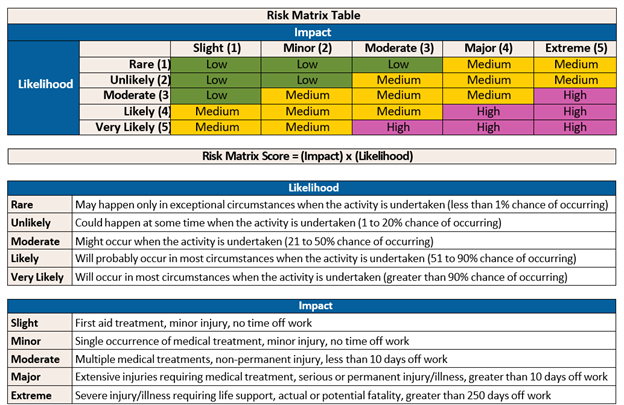
Table 1. Risk Matrix Table
Here is an example showing how to use the Risk Matrix Table:
A possible event could be a needlestick injury when setting up a procedure. The likelihood of this happening is considered Rare if the needle remains capped during set-up. At this step, the impact of a needlestick would be considered Trivial because the needle is unused.
The next step in the procedure is using the needle. This step in the procedure increases the likelihood of a needlestick to moderate and the impact after it is used to minor or extreme based on the material. The risk may move from low to medium or high as the procedure is performed.
Now you are ready to identify safety controls to reduce the likelihood and impact, therefore reducing the risk. Based on risk level, prioritize addressing the risks from high to low.
Step 3: Determine Controls
Risks are reduced through implementation of control measures. Select the most feasible, effective, and permanent controls. Multiple control methods may need to be combined to best protect workers.
What Are Feasible Controls?
To decide if a control is feasible, you need to know how well it can protect workers, the community, and the environment, and whether it can be implemented successfully. Consider whether it is:
- Right for the hazard
- Appropriate, given how likely injuries/illnesses are
- Consistent with employer policies, laws, and regulations
- Not too burdensome to workers
- Recognized as an appropriate practice in the industry
- Effective, reliable, and durable
- Readily available
- Cost-effective, short- and long-term
Hierarchy of Controls
The hierarchy of controls identifies and ranks safeguards to protect workers, the community, and the environment from hazards. Controls are arranged from the most to least effective and include elimination, substitution, engineering controls, administrative controls, and personal protective equipment. See Figure 3. Hierarchy of Controls. Safety controls are documented within the applicable Hazard Control Plan and/or the Authorization Applications for Institutional Oversight requirements.
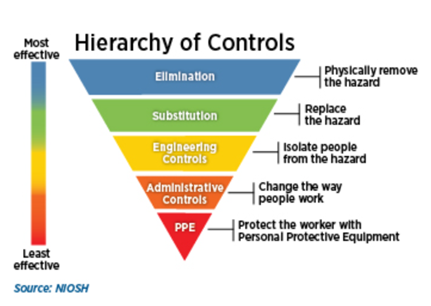
Figure 3. Hierarchy of Controls
- Elimination: Removes the hazard completely. This is the most effective method.
- Example: Change a work process to stop using a toxic chemical, heavy object, noisy equipment, or sharp tool.
- Example: Remove glass equipment when working with high-risk materials.
- Substitution: Replaces the hazard with a safer/less-hazardous alternative.
- Example: Using Ethidium Bromide (EtBr) alternatives, like SYBR Safe, which are non-cytotoxic, non-mutagenic, and are considered to be safe for both the user and the environment.
- Example: Identify an alternate lower hazard solvent for methylene chloride using a resource such as the Solvent Selection Tool from the American Chemical Society.
- Engineering Controls: Removes a hazard or places a barrier between the employee and the hazard. More information can be found on the Engineering Controls for Laboratory Safety Blink page.
- Example: Biosafety cabinets or tissue culture hoods and chemical fume hoods are common engineered safety equipment that help provide sterile work areas, filter out potentially infectious agents, or capture, contain, and exhaust dangerous chemical fumes, vapors, or particulates.
- Example: Implement engineered sharps, like retractable needles or plastic pipette tips, when working with hazardous materials.
- Administrative Controls: Changes work procedures with the goal of reducing the duration, frequency, and severity of exposure.
- Example: Implement a protocol for hazard communication when performing high-risk operations, such as posting signage when running a reaction on a hot plate unattended.
- Example: Implement a medical surveillance program for work with hazardous materials. This may be a consultation, medical monitoring, or offer of a vaccine.
- Personal Protective Equipment (PPE): Controls hazards that cannot be eliminated through engineering and administrative controls. PPE includes clothing and accessories designed to protect against safety and health hazards. While still very important, this is the least effective method to control hazards and should be combined with other controls depending on the risk. Visit Lab PPE to learn more.
- Example: Assign personnel protective equipment to researchers: gloves, safety glasses/goggles, masks, and lab coats.
- Example: When handling liquid nitrogen, cryogenic gloves are available and used in the lab.
Collaboratively choose the control(s) that are highest on the hierarchy. Remember that you may need a combination of control methods (such as engineering controls plus administrative controls) to provide the best level of protection. If you need assistance in determining appropriate controls, contact your EH&S RAP representative.
Step 4: Implement Controls
Once control measures have been determined, the researcher should take steps to implement them into their work processes before beginning the job task. The lab must verify adequate facility design, equipment, experimental setup, and appropriate PPE before conducting any hands-on experiments.
Hazard Control Plans (HCPs) and standard operating procedures (SOPs) are tools for documenting and communicating the correct procedures for the process, equipment, or agent. These documents are readily available for researchers to review and acknowledge. Researchers must also be properly trained on the correct procedures, and the lab documents this training. Refer to the Laboratory-Specific Training to learn more about procedures for conducting and documenting on-the-job training.
Step 5: Review Effectiveness of Controls
The next step in the Risk Mitigation Process is to evaluate the effectiveness of the safety controls. Review of the controls tracks the progress and assesses if the controls are adequate in mitigating risks.
Laboratories can use a myriad of methods for documentation: lab meetings, informal/formal discussion, and existing My Research Safety Tools.
- Hazard Control Plans
- Laboratory Hazard Assessment Tool
- Lab-Specific Protocols
- Self-Audit Checklist and Inspection Portal/Audit Tool
The following prompts can be used as a guide for labs to evaluate their controls:
- Have the controls been implemented?
- Are engineering controls installed, accessible, and functioning?
- Are personnel trained to use the controls?
- Do lab members know how and when to use controls?
- Do lab members know what to do if controls require replacement/repair?
- Do recent self-audits and EH&S Laboratory Audits show any findings surrounding controls?
- Are personnel aware of and correctly using personal protective equipment?
- Have there been incidents or near misses? Do these incidents/near misses show a root cause that requires additional controls?
- Are there suggestions for improvement or modifications to the controls?
- Has the research project, scope, or experiment been changed?
- Are preventative maintenance measures in place for controls?
Discuss the controls, implementation, and effectiveness to decide if the risk mitigation is adequate. Document the evaluation. If additional controls are needed for a task/procedure, refer to the Risk Mitigation Process Step 3: Determine Controls and Step 4: Implement Controls.
The Risk Mitigation Process is a continuous and collaborative effort to ensure laboratories provide safety controls as research advances and changes.