Add Content to a Blink or TritonLink Template in the CMS
Find out how to add content to a Blink or TritonLink page.
When you click Edit on a page in Blink or TritonLink the Edit screen will pop-up, showing the fields you can edit for that page.
Tip: If you find it difficult to enter your content in the small text area, click the full screen icon ![]() toggle to bring up a full screen. To return to the regular view, click the full screen icon again.
toggle to bring up a full screen. To return to the regular view, click the full screen icon again.
Common fields
Pages start with the metadata fields: Display Name, Title, Summary, Author.
Introduction
- Intro: Type in a one-sentence description of the page. It will automatically show up in the subhead font. Note: This is often the same content as in the Summary field (see metadata).
- Image: You can upload a decorative image here.
- Alt Text: if you do upload an image, enter alt text here. This is mandatory for accessibility.
- Image-Alignment: The image will be aligned to the right of the text by default.
Main Content - Body
- Article template: Enter the main content here. You can use the WYSIWYG editor or enter code directly through the HTML view.
- Drawer template: The body area in the drawer template is for any content that needs to appear between the intro and the first drawer.
- Main Content >> Drawers: Each drawer will have 2 components:
- Drawer Title: Enter the title for that section. Keep it as short as possible (text only-no formatting). This is automatically a heading 2 and will become an anchor link.
- Drawer Body: Enter any type of content here. Note: Do not use heading 2 inside the drawer. This will cause an error. Start with heading 3 inside a drawer. Learn more about headings.
- The template will have 1 drawer by default: To add a new drawer, click the plus sign above the drawer title. To delete a drawer, click the red X symbol. You can also reorder drawers by using the up and down arrows.

- Main Content >> Drawers: Each drawer will have 2 components:
- FAQ template: The body area in the FAQ template is for any content that needs to appear between the intro and the first section.
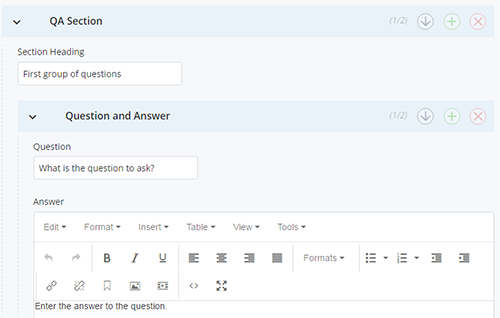
- Main Content >> QA Section
- Section Heading: Enter a description for that section. If you only have one section, enter "Frequently Asked Questions".
- Main Content >> QA Section >> Question and Answer:
- Question: Enter the question here (text only-no formatting).
- Answer: Enter the answer here.
- The template will have 1 section and 1 question and answer pairing by default. To add a new section or question, click the plus sign next to the field. To delete one, click the red X symbol. You can reorder sections and
questions by using the up and down arrows.
- Main Content >> QA Section
Contact Line
Enter contact information here. It will automatically show up in the green box. Do not use paragraph formatting here because it will create an extra line of space under the text. To fix this, select the text and use the WYSIWYG to choose Formatting >> Clear Formatting.
Main Content >> Additional
- Additional Content: If your content needs to show up after the green "contact" box, it shows up here.
- Disclaimer: If your page includes a disclaimer, choose the block here.
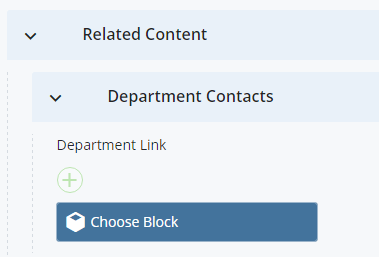
Related Content
- Related Content >> Department Contacts: This is where you choose a departmental home page link to show up in the blue "Departments" box underneath the left-hand navigation.
- Click Choose Block
- If you need to add multiple Department Contacts, click the plus sign.
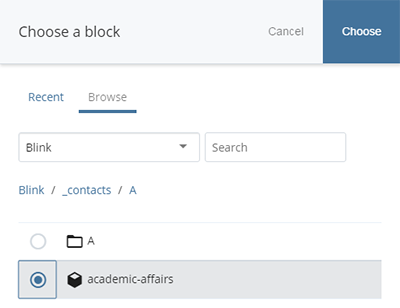
- Click Browse to navigate to the /_contacts folder.
- Select your department.
- Click Choose
- Related Content >> See Also Links: Enter links here for related content (other Blink pages, files, links to OP, etc.) to show up in the orange "See Also" box.
- Type in the link text and then type in the URL for external links or use Choose Page or Choose File to select an internal link or file.
- Use the plus sign to add additional "See Also" links. We recommend that you use these links sparingly.

Notes
Enter any editorial or internal notes. This won't show up on the page.
Save your changes
Click Save & Preview to save your draft.
Click Submit to save the page in the CMS and prepare for publishing.