How to Enable Students to Download Your Video
Allowing students to download your videos can serve a variety of purposes. Read below to find out how.
By default, students aren't able to download any of your course videos from your course in Canvas. This feature must currently be enabled on a video-by-video basis.
You can allow students to download your video within the Media Gallery OR within an embedded video. We'll provide instructions for both methods below, as well as instructions you can pass on to your students on how to actually download it.
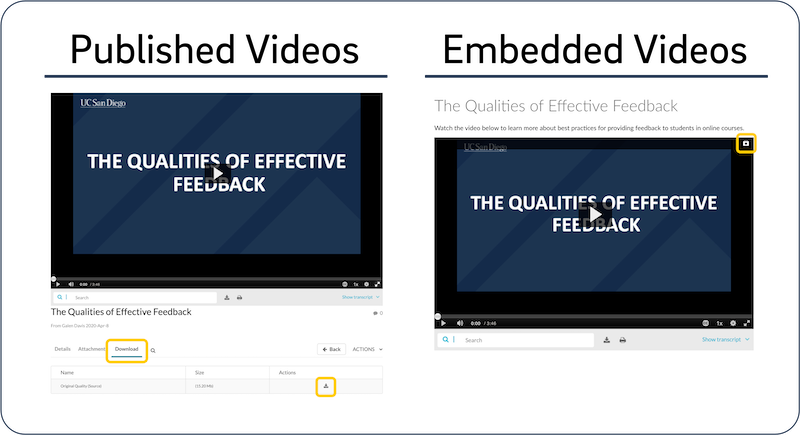
How to Enable Downloads for Published Videos
Note that in order to pursue this path of making your videos downloadable, your video must be published to the course (i.e. be visible in its Media Gallery). If you need a refresher, check out our documentation on the difference between embedding and publishing.
If you want students to be able to download a video you've embedded, check out the other drawer on this page.
- Ensure that your video is published to the course in which you want students to be able to download it.
- Within Canvas, click "My Media" in the left navigation.
- Locate the video that you want students to be able to download, and click the pencil icon on the right side of its row.
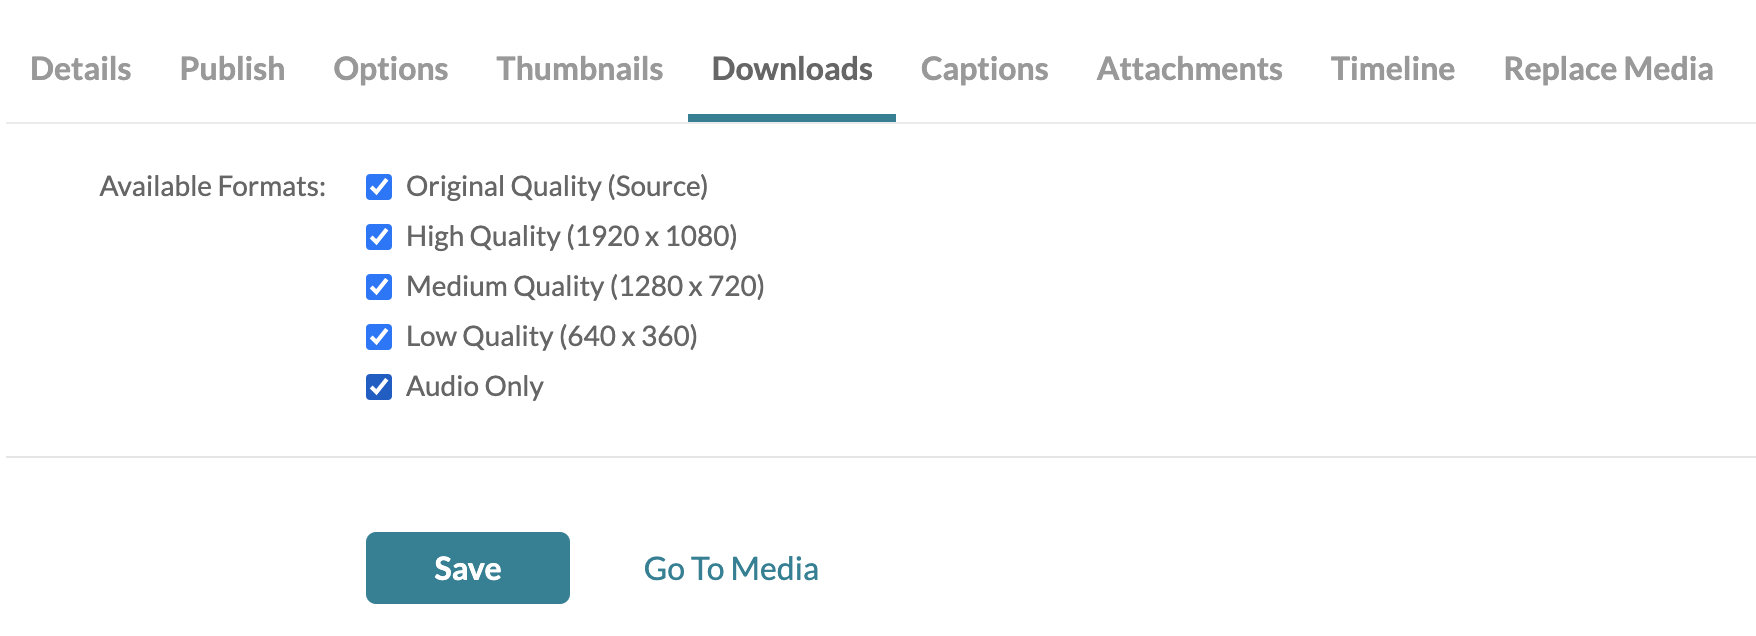
- Click the "Downloads" tab beneath the video preview. The information below the tab will repopulate. You should see several options (which Kaltura refers to as "flavors") for downloads that you can enable. Check all the boxes. See the table below for more information about each flavor.
| Download "Flavor" | Description |
|---|---|
| Source | The highest-quality version that you can download. It's the original file that was uploaded. |
| Higher quality | Size: 1920 x 1080 ("1080p") Target bitrate: 6000 kbps |
| High quality | Size: 1920 x 1080 ("1080p") Target bitrate: 4000 kbps |
| Medium quality | Size: 1280 x 720 ("720p") Target bitrate: 2500 kbps |
| Low quality | Size: 640 x 360 Target bitrate: 900 kbps |
| Audio only | Size: N/A (only contains audio) Target bitrate: 128 kbps |
- Once you've selected your desired quality levels for the video download, be sure to click "Save" at the bottom of the screen.
If you want to send students the instructions on how to download the embedded video from the Media Gallery, point them to the instructions in the appropriate drawer below (https://blink.ucsd.edu/faculty/instruction/tech-guide/instructional-videos/videos-canvas/presenting-videos/enable-downloads.html#[For-Students]-How-to-Download-).
How to Enable Downloads for Embedded Videos
The way to enable students to download your video if it's embedded in a piece of Canvas instructional material is to select a different embed player - specifically one that has a download button in the upper-right corner of the player window. If you’re interested in learning more about alternative embed players, check out our documentation on custom embed players.
For the sake of the instructions below, we'll assume you've already created the course element in Canvas (e.g. the Canvas "page" in which you plan to embed the video).
- Within Canvas, enter the course in question.
- Locate the course element in which you want to embed a downloadable video and click on it.
- Click "Edit" in the upper-right corner of the page.
- Within the rich content editor, click the Kaltura icon ("Embed Kaltura Media"), which looks like a rainbow flower.

- In the window that opens, locate the video within your "My Media" that you want to embed and click the gear icon in its row.
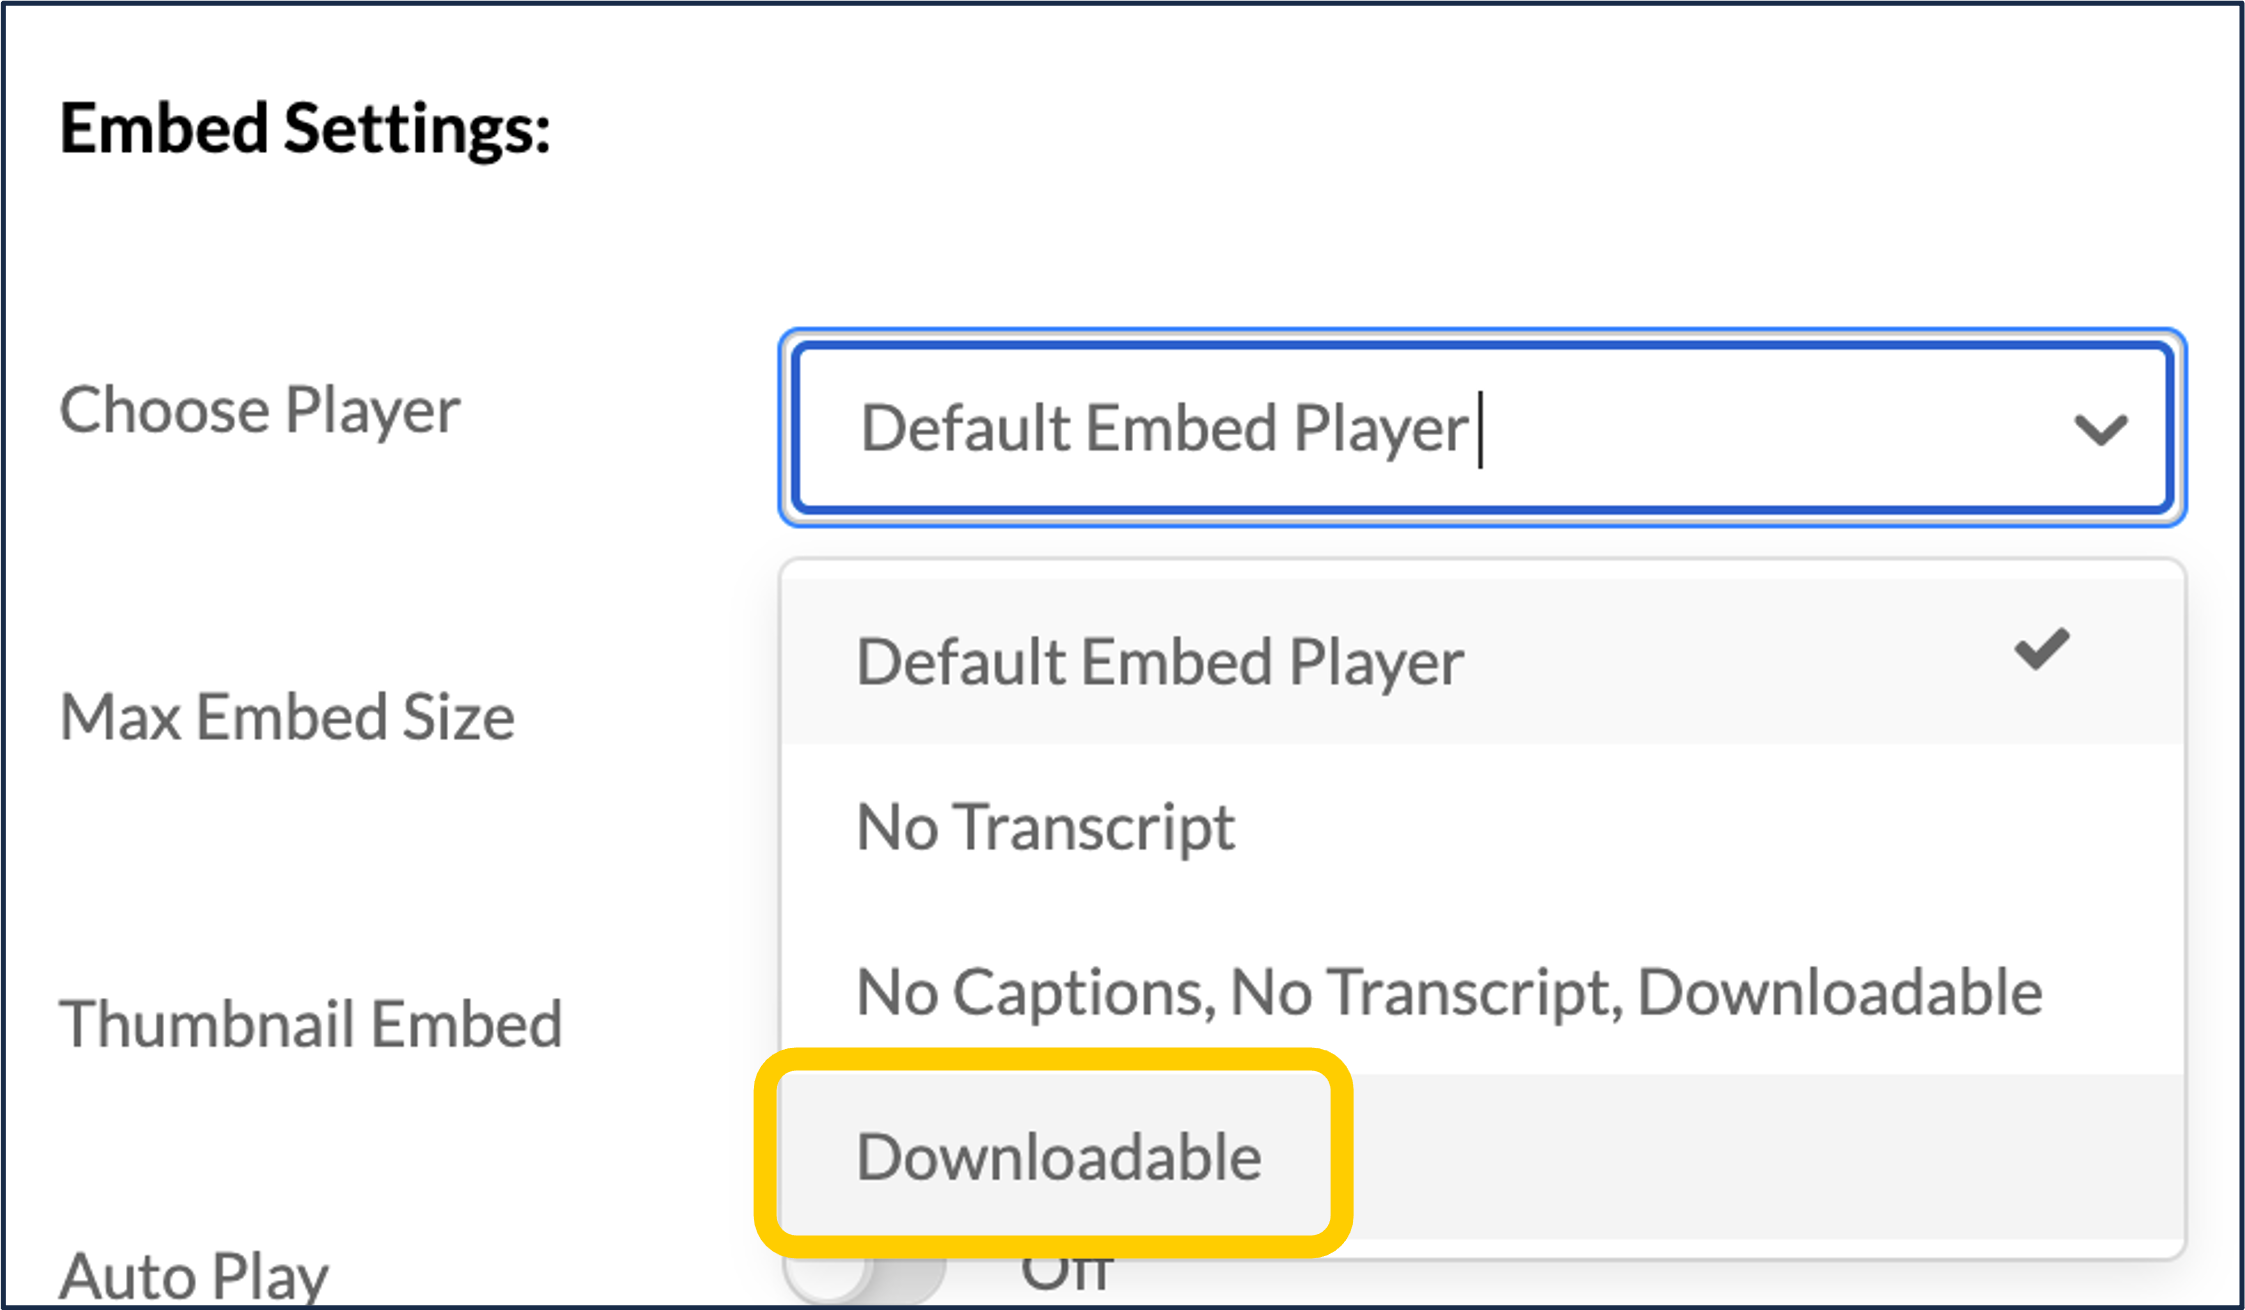 In the "Choose Player" pull-down menu, select the "Downloadable" player.
- Set any other additional settings you prefer for your embed, such as the embed size. If you want to learn more about these settings, check out our documentation on custom embed players.
- Be sure to un-check "set as my default settings." Otherwise, if you embed future videos (and don't opt to configure them), the download player will be used.
- Once you're done configuring your embed settings, click the "</> Embed" button at the top right of the window.
Now when a user views your video within the course element, they'll see a small download icon in the upper right corner of the player. If you want to send students the instructions on how to download the embedded video, point them to the instructions in the appropriate drawer below (https://blink.ucsd.edu/faculty/instruction/tech-guide/instructional-videos/videos-canvas/presenting-videos/enable-downloads.html#[For-Students]-How-to-Download-).
[For Students] How to Download a Video from the Media Gallery
If your instructor has enabled downloads for a video published to the Media Gallery, it may not be immediately clear how to download it. Note that videos by default are NOT downloadable - your instructor must have enabled it for that particular video.
- Enter your course in Canvas and click on "Media Gallery."
- Locate the video in the list of published videos and click on it.
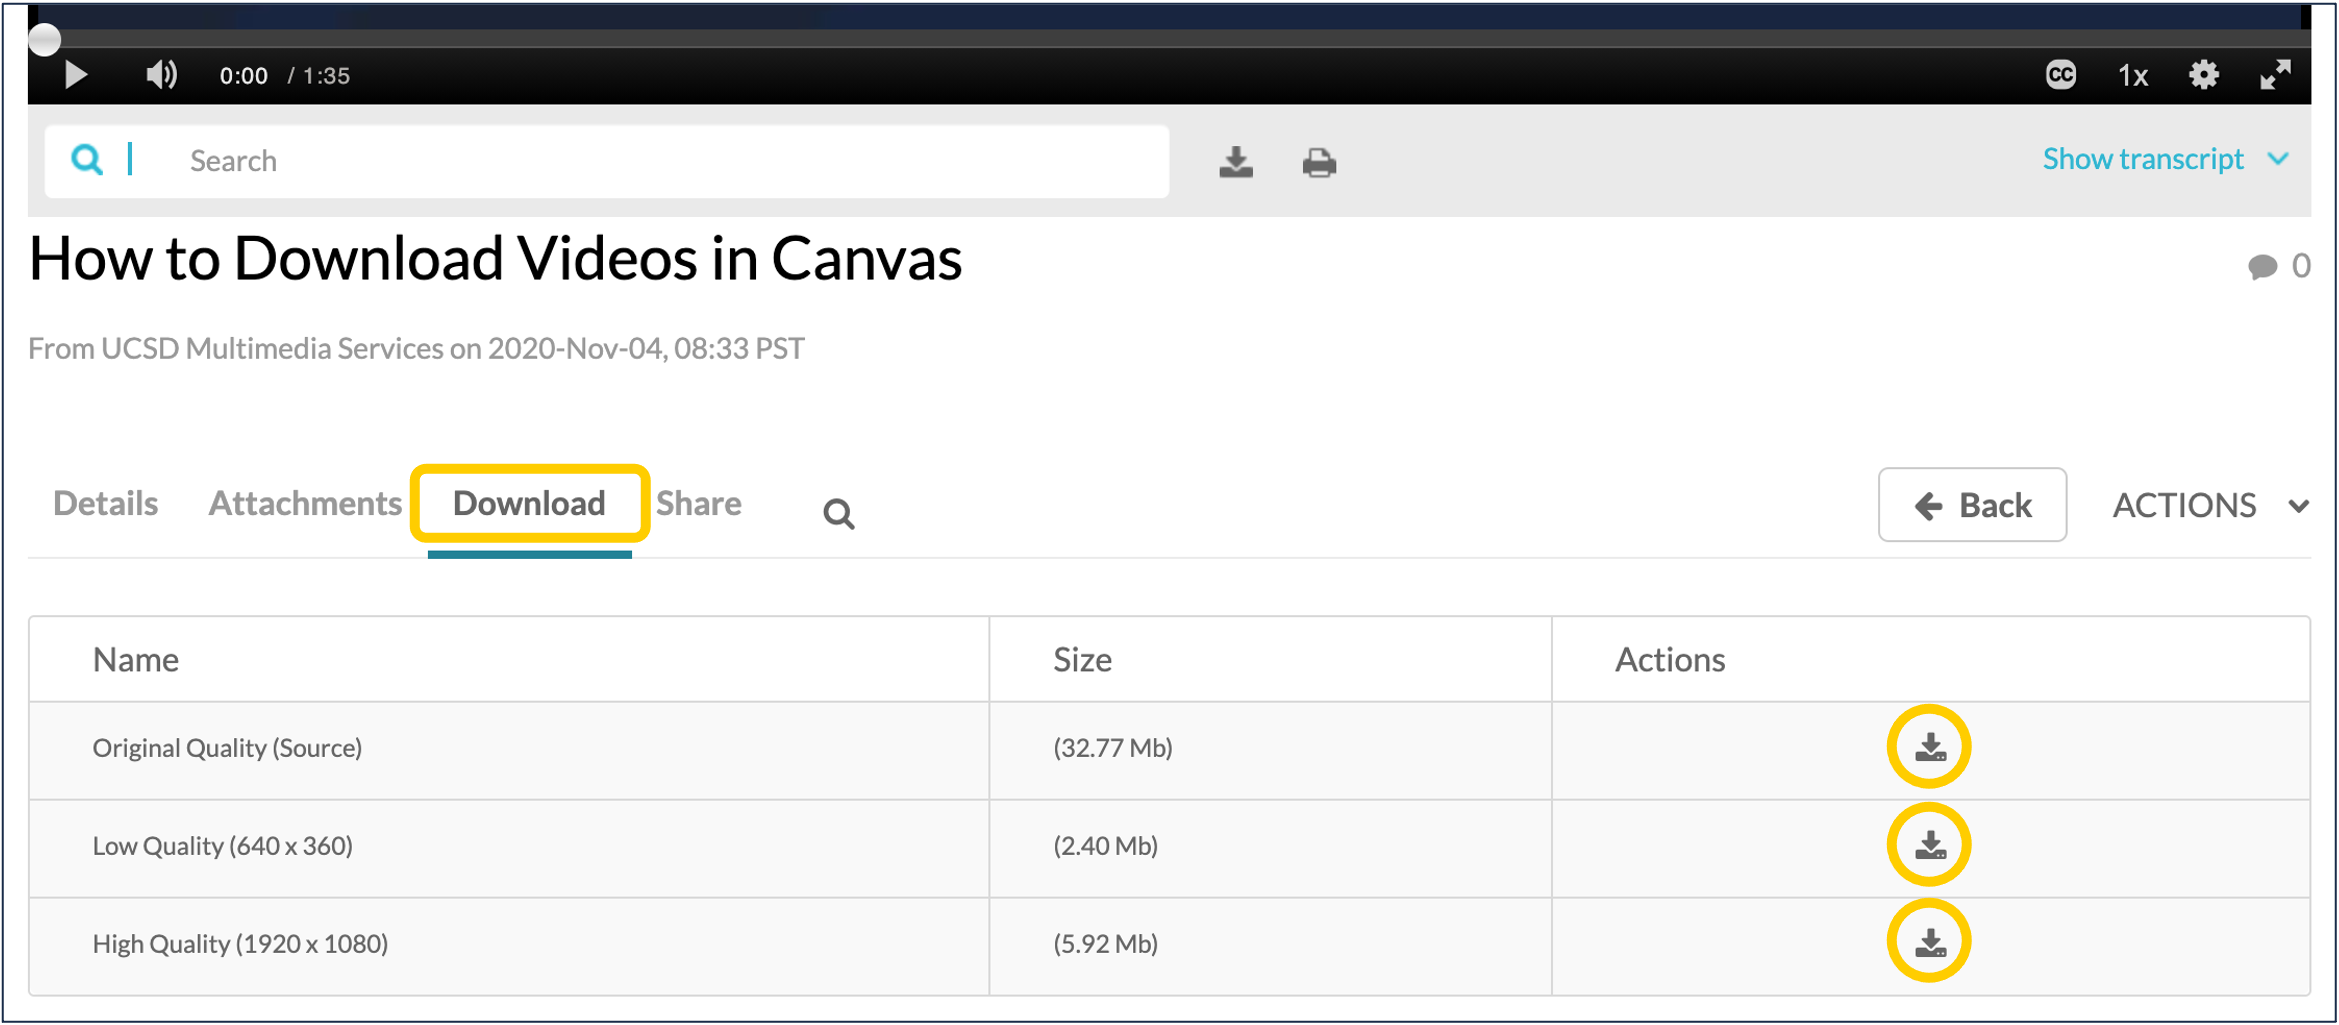
- On the video's page, click the "Download" tab below the video preview. You should see one or more rows of various video quality options.
- Click the downward arrow icon on any of the rows to download the video at that quality level.
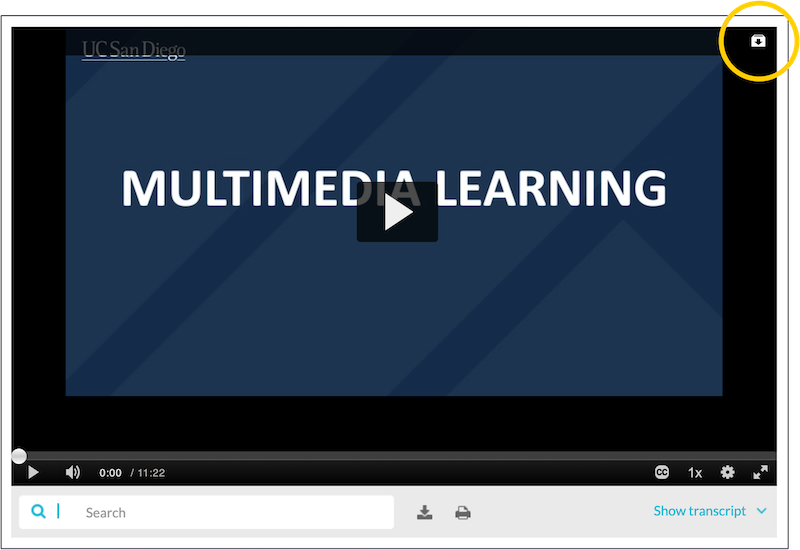
[For Students] How to Download Embedded Videos
By default, the videos that your instructors embed into course elements in Canvas aren't downloadable. However, it is possible for them to use a customized embed player that allows you to download the video's source file. Here's how.
- Within your course in Canvas, locate the course element that has the video embedded in it and click on the course element.
- Within the video player, you should see a small icon in the upper right corner of the player that has a downward arrow. Click on that and you'll start downloading the video to your computer.