How to Embed a Video within Canvas
You can insert a video into a variety of instructional materials. Here’s how.
There are two main ways to make your videos visible to your students in Canvas: publishing them to the Media Gallery and embedding them into instructional materials (like pages, assignments, quizzes, etc.). If you want to learn more about the difference between embedding and publishing, check out our article on publishing versus embedding.
One particularly handy feature of embedding videos (rather than publishing them to the Media Gallery) is that you have a few choices of players - for example, a player that has a download button, or a player that doesn't use the transcript widget. Open the drawer on configuring embeds below to learn more.
How to Embed a Video
In this context, embedding a video just means inserting the player onto a web page within Canvas. You can do this anywhere you see the rich content editor by clicking the "embed Kaltura media" icon.
- Within Canvas, enter the course in which you want to embed a video.
- Locate the piece of instructional material in which you want to embed the video (such as a Canvas "page") and click on it.
- Click "Edit" in the upper right hand corner.
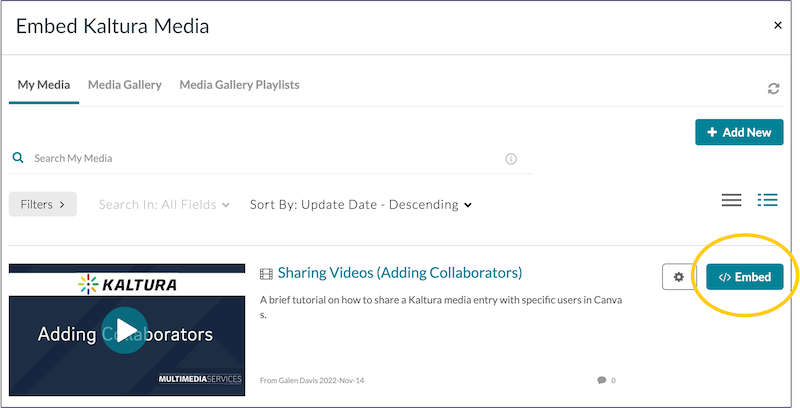
 Within the rich content editor, click the Kaltura icon. (It looks like a small rainbow-colored wheel, and the words "Embed Kaltura Media" will appear if you hover your mouse over it.)
- Identify the video you want to embed from your "My Media."
Two things to note here: a) you can use the tabs at the top to select videos or playlists in the Media Gallery, and b) you can use search/filter functionality to find your entry quicker.
- Once you've identified the video you want to embed, click the blue "Embed" button in its row.
Note that if you click the gear icon, you can configure some aspects of the embedded video. Check out the drawer below on "configuring embed settings" to learn more.
- Make any other changes you want to the course element, and be sure to click "Save" when you're done.
Your video should now be playable within the course element.
How to Embed a Playlist
Ultimately, embedding a playlist is nearly identical to embedding a video.
- Within Canvas, either create or edit a piece of instructional material that uses the rich content editor (RCE). You should be looking at the page that contains the RCE (where you can add text and other media objects).
- Click Kaltura's rainbow logo within the RCE ("Embed Kaltura Media").

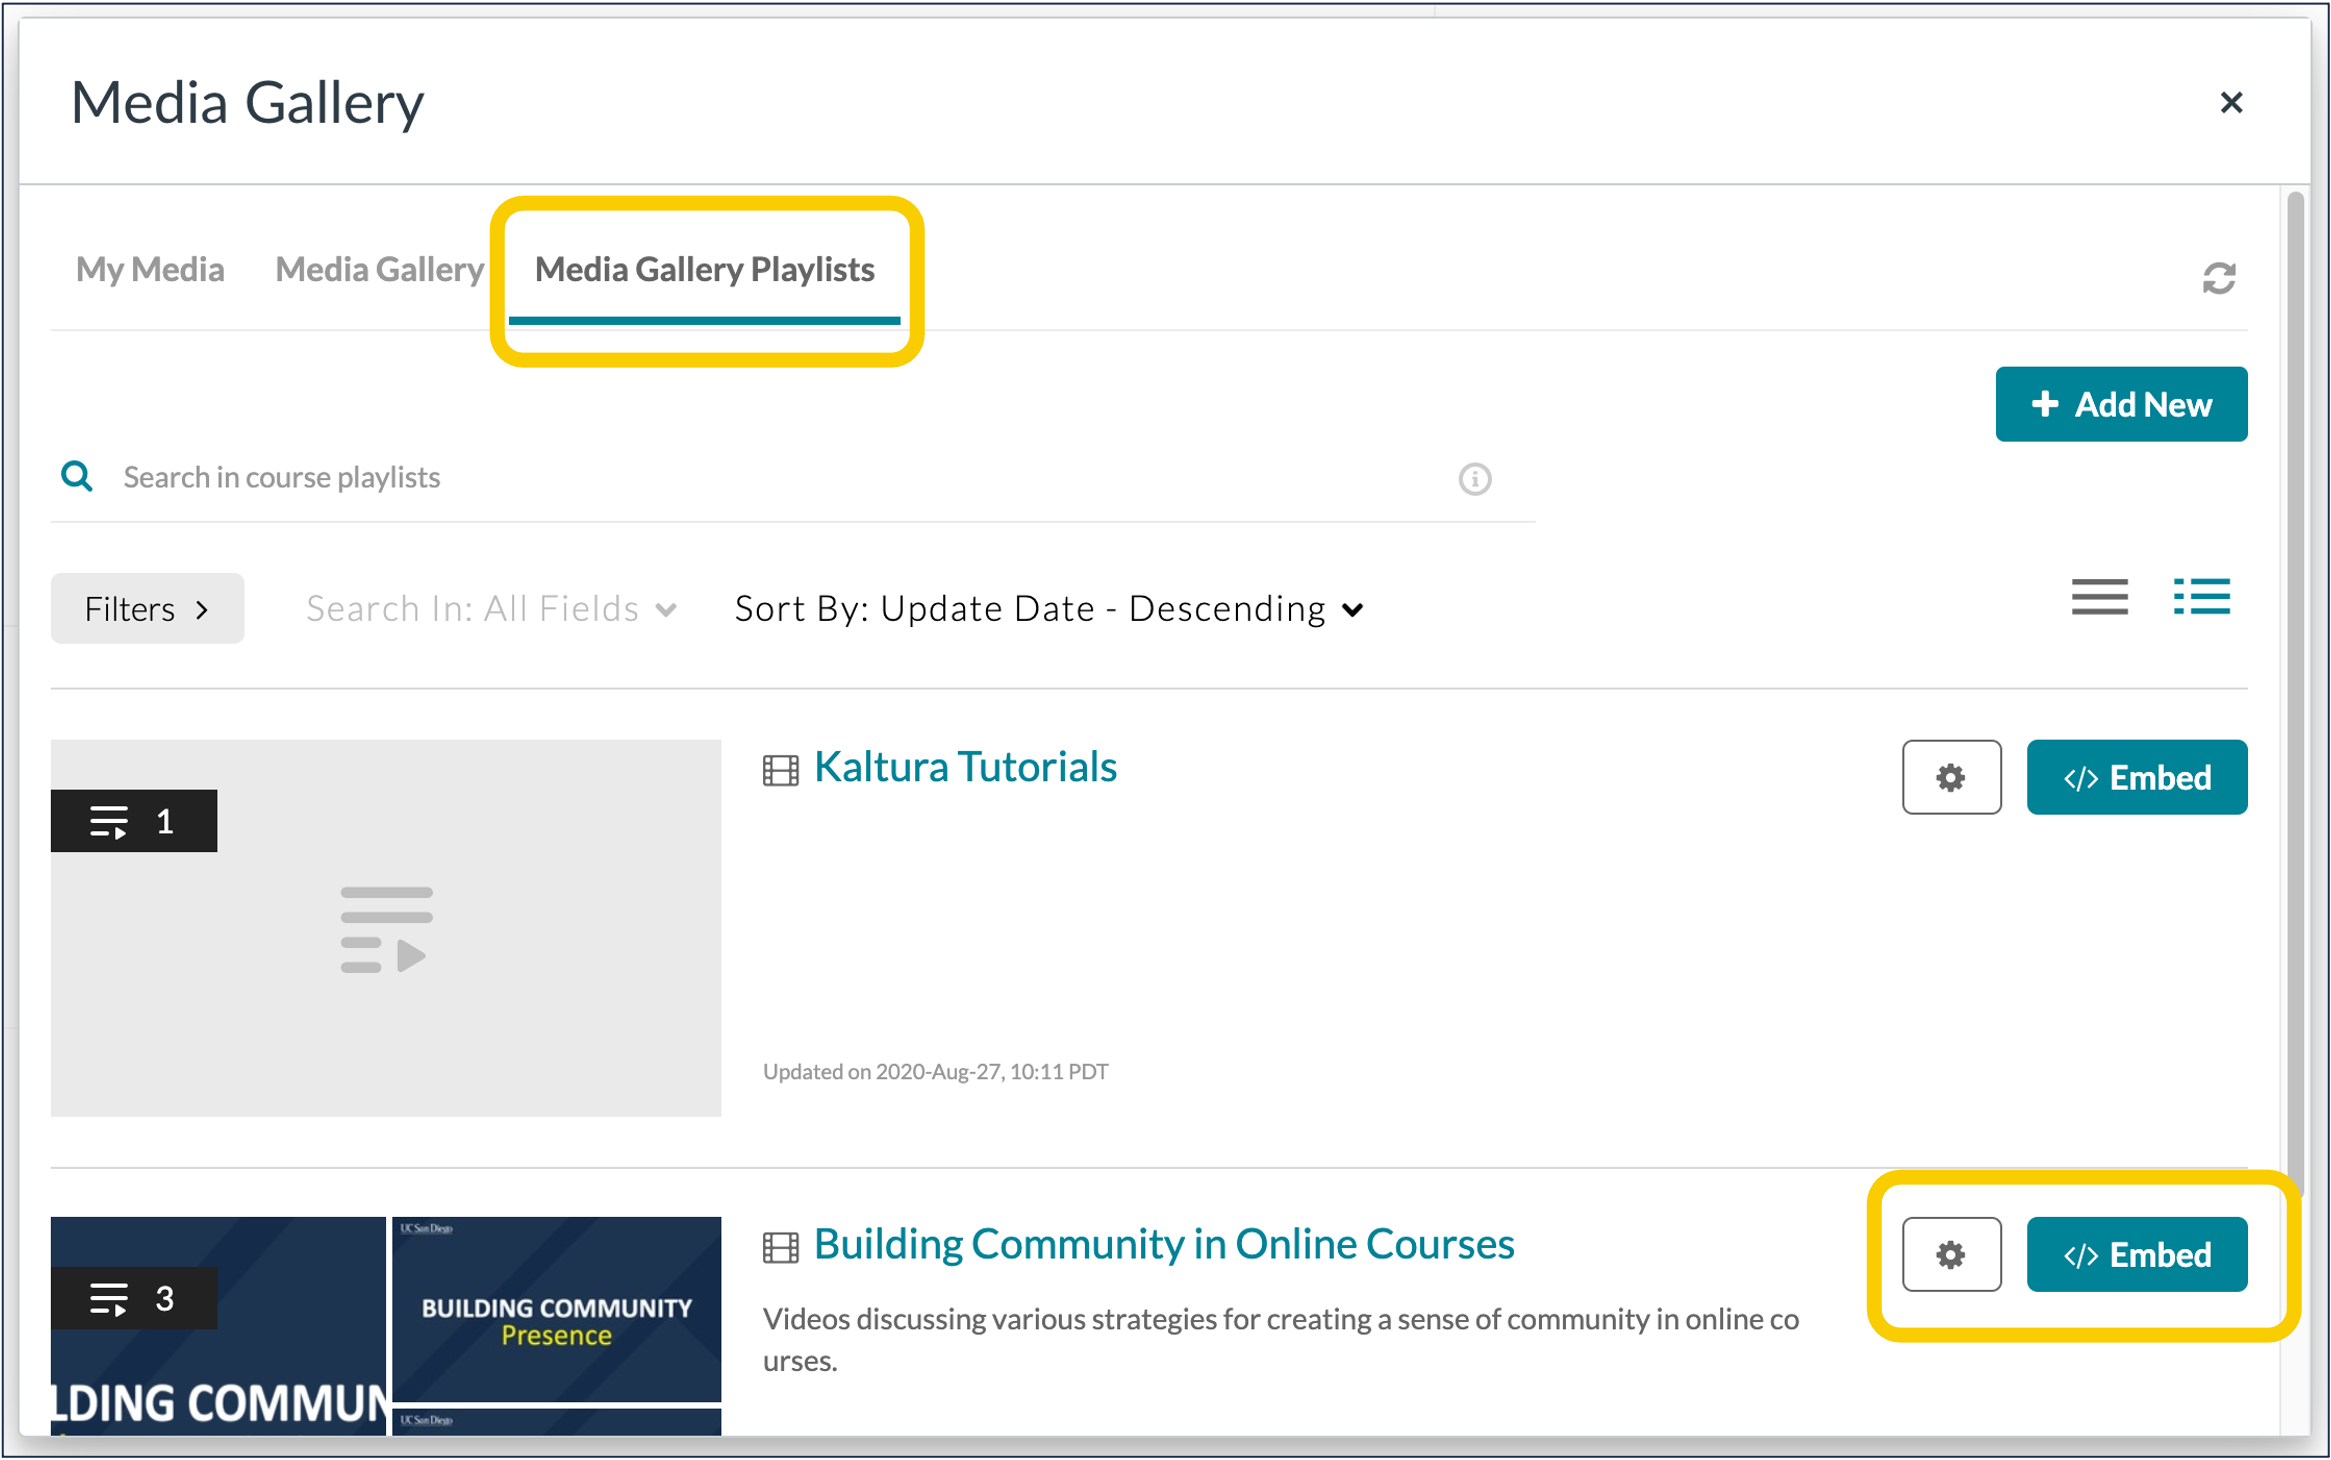
- In the window that appears, click "Media Gallery Playlists" at the top.
- Find the playlist you want to embed and click the "</>Embed" button
Note that if you want to configure some specifics about your embedded playlist, click the gear icon instead of the embed button. You can learn about custom embed players elsewhere in this tutorial.
- Once you've embedded the playlist be sure to click "save" at the top right of the screen to save the changes to the course element.
Note that you can still use the rich content editor to add text or any other items into the course element as you would normally, either above or below the embedded playlist.
Configuring Embed Settings
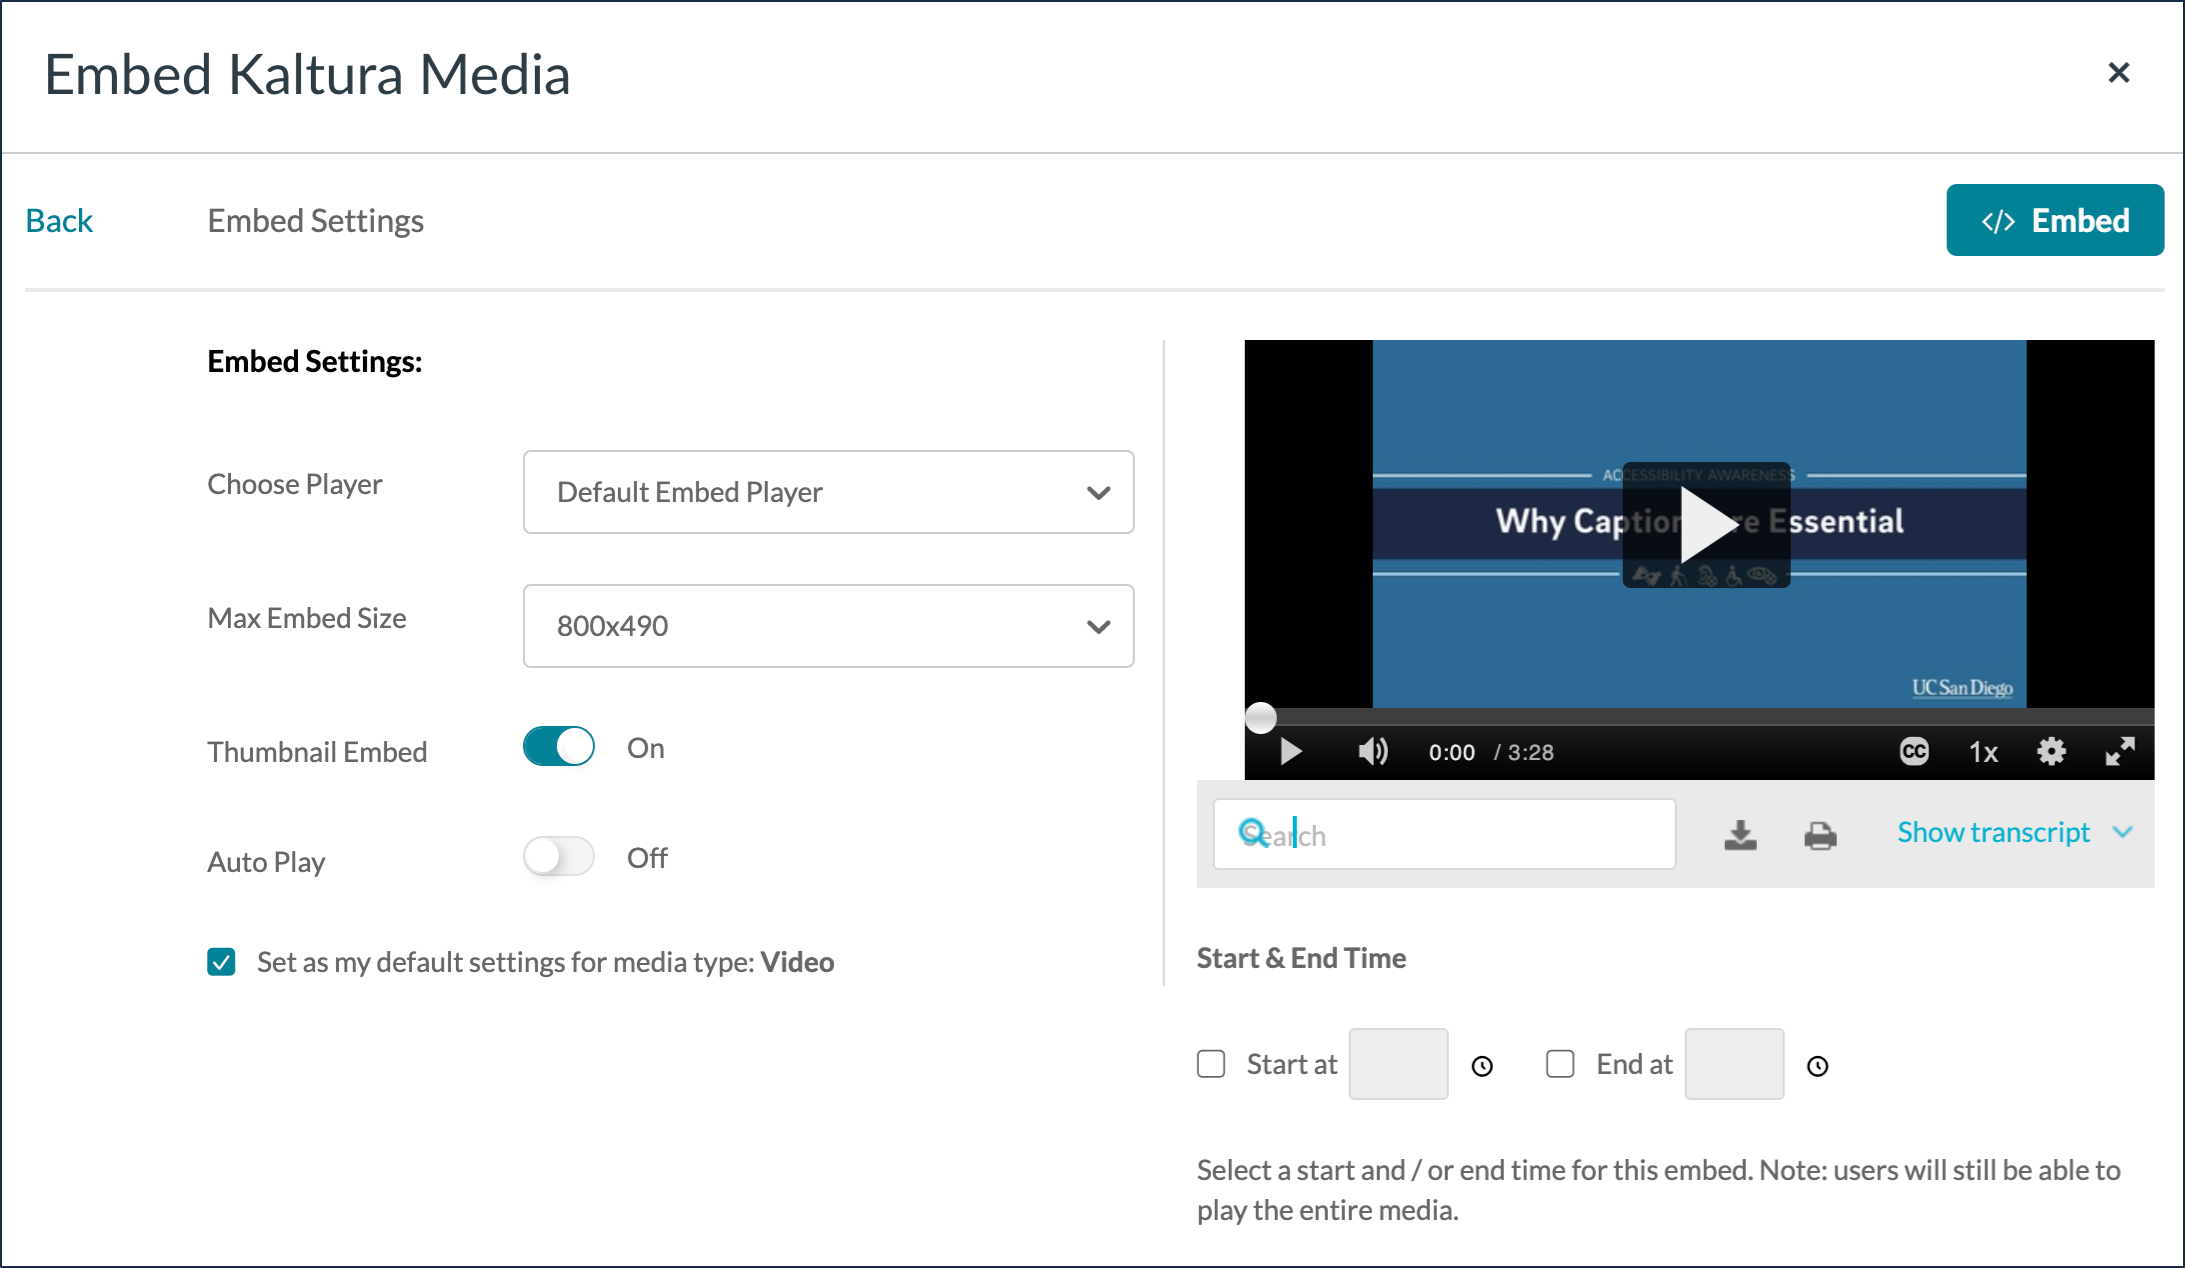
 After you've clicked the "embed Kaltura media" button and you're looking at your list of media that you want to embed, there's a little gear icon next to the "Embed" button for each video. If you want, you can click it to configure a few settings regarding your embedded video. See the table below for information about each function.
| Function | Description |
|---|---|
| Choose Player | Allows you to select video players that have certain features enabled or disabled. If you need an embedded video player that meets certain requirements (for example, no transcript widget, no speed controls, etc.), drop us a line at kaltura@ucsd.edu. See the section below for more information about custom players. |
| Max Embed Size | Lets you choose how big the video will be on the page (from a few options). |
| Thumbnail Embed | An either/or setting in conjunction with Autoplay. If enabled, the video embed will appear as a small thumbnail with a play button. If the play button is clicked the player will appear. |
| Autoplay | An either/or setting in conjunction with Thumbnail Embed. If enabled, the video will automatically begin playing when a user comes to the page. |
| Start & End Time | Allows you to control where the video will begin and end, though users can still view the entire video if they so choose. |
Custom Embed Players
 As mentioned above, when configuring your embed, you can select one of several kinds of players, depending on the media type. How is this advantageous?
Well, for example, what if you don't like the way the transcript widget affects text wrapping around your embedded video? Just choose the "no transcript" embed player before you embed your video instead of the default player. Want your students to be able to download the embedded video? Select the player with the download button in it.
Embed Player Commonalities
So while there are some differences among the players you can select, what's the same?
- Closed captions button in the toolbar. Though some of the players vary in terms of whether the captions are visible in the player by default, all players have a closed caption button allowing users to select whether or not to have the captions visible.
- Captions below the video. In September 2021, we changed the way captions are displayed in all videos in Canvas, whether published or embedded. Previously captions were at the bottom of the player, but layered on top of the video, which occasionally resulted in onscreen content being blocked by the captions. We changed this so that the captions now display in a black bar below the video. As a result, the video itself is a little smaller within the player, resulting in black bars on either side of the video.
- Video quality selector. By default, Kaltura will detect the viewer's bandwidth and determine the quality that will create the best viewing experience. Viewers can override that by choosing a specific quality level using the quality selector. Note that quality levels are dependent on the quality of the original video, and sometimes alternatives don't exist.
- Full screen toggle. Viewers can choose to make the video fill the screen.
See the section below to learn more about the specific embed players available for you to use.
Embed Player Differences
The table below summarizes all the main differences between the various embed players. The differences at present manifest in terms of whether captions are visible or hidden, whether the transcript widget is present, whether the video is downloadable, whether speed controls are visible, and what embed sizes are available.
"Media type" refers to the kind of media player being used. If you're embedding a playlist, for example, the player options you're shown are ONLY playlist player options. (And right now, we don't offer anything but the default, so that's all you'll see in the pull-down menu.)
"Player title" refers to what you'd see in the pull-down menu when selecting an alternative embed player. Note that we haven't created alternate players for playlists and audio-only files.
| Media Type | Player Title | Speed Controls | Closed Captions | Transcript Widget | Downloadable | Available Embed Sizes |
|---|---|---|---|---|---|---|
| Video | Default Embed Player | Yes | Visible | Yes | No | 800x750 600x640 400x525 |
| Captions Off, No Transcript, Downloadable | Yes | Hidden | No | Yes | 800x480 600x370 400x255 |
|
| No Transcript | Yes | Visible | No | No | ||
| No Speed Controls, No Transcript | No | Visible | No | No | ||
| Quiz | Default Quiz Player (No Transcript) | Yes | Visible | No | No | |
| Quiz | Quiz Player (With Transcript) | Yes | Visible | Yes | No | 800x750 600x640 400x525 |
| Playlist | Default Playlist Player | Yes | Visible | Yes | No | 1000x835 800x720 |
| Audio | Default Audio Player | Visible | No | No | 600x70 |
Do you have a use case for a specific type of media player? Start a dialogue with us at kaltura@ucsd.edu.