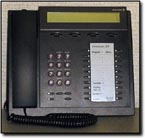
Phone Model: Ericsson DBC 213
Last Updated: October 13, 2022 1:29:37 PM PDT
Give feedback

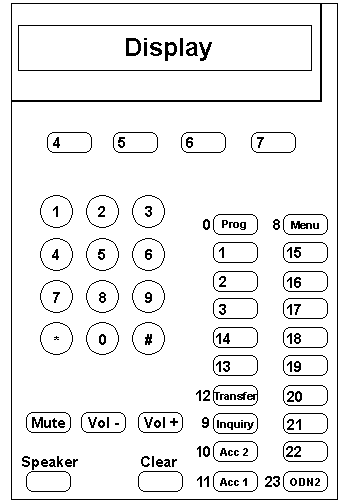
Learn about the DBC 213, a multi-line digital telephone with an LCD screen and a speakerphone.
Standard features
|
|
Instructions

- Volume control
- Liquid Crystal Display
- Function buttons
- Lamps
- Access lines
- Placing calls
- Dial additional digits
- Last number redial
- Receiving calls
- Receiving calls on second line
- Loudspeaker
- Call hold
- Pitch adjustment
- Ring options
- Speed dialing
- Multiple appearance directory numbers
- Default for diversion message digits
- Soft keys
- Different call states for soft keys
- Timer
- All Multi-Line digital telephones are designed to provide single-key access to many of the Ericsson MD110 features.
- Each key may be programmed independently.
- Many features not programmed for single-key access may be accessed via the dial pad.
1. Volume control
Adjusts:
- Loudspeaker
- Handset
- Ringer volumes
2. Liquid Crystal Display (LCD)
Displays:
- Information on type of call being answered
- Numbers dialed
- Programming information
3. Function buttons
Used to:
- Activate features programmed as speed dial numbers, or as line appearances of other lines.
- Cancel features.
4. Lamps
Red light indicates line or feature in use.
5. Access lines
- Receive and place calls on access 1 and access 2.
- Only place calls on access 3.
6. Placing calls
Displays:
- Pick up handset and dial.
or - Dial without picking up handset. Call will be on loudspeaker.
7. Dial additional digits (end-to-end DTMF calling)
This feature allows you to send DTMF tones while in speech state for pager access, credit card calls, voice messages or any type of computerized network requiring DTMF signaling.
To activate:
To activate:
- While connected to a party, dial 9.
or - Press soft key associated with the feature ETE on your screen.
- Place the call on hold or disconnect the call.
8. Last number redial
Dial ***
9. Receiving calls
- Press flashing line button, then pick up handset.
or - Press flashing line button without picking up handset. Call will be on loudspeaker.
10. Receiving calls on 2nd line
- Press accept second call function button (lamp is on).
- While activated, allows second incoming call to ring on next available access line when other line is busy (access 1 or 2).
- To answer, press flashing line button. First call will automatically be placed on exclusive hold.
- To cancel, press accept second call (lamp is off).
11. Loudspeaker
- Lamp beside speaker key indicates loudspeaker in use.
- To change from handset to loudspeaker, press speaker key and replace handset.
- To change from loudspeaker to handset, pick up handset. Adjust loudspeaker volume with volume control wheel/slide lever.
12. Call hold
Exclusive hold:
(Call can only be retrieved from your phone)
(Call can be retrieved from any phone)
(Call can only be retrieved from your phone)
- With party on line, press line button that received call.
- To retrieve, press same button again.
- Pressing available line button (Access 1, 2, or 3) will also put call on exclusive hold.
(Call can be retrieved from any phone)
- With party on line, Dial 8 on dial pad.
or - Press common hold function button.
- Hang up.
- Press flashing line button holding call.
- Dial extension where call was placed on common hold.
- Listen for busy tone.
- Dial 8 on dial pad to connect call.
- With party on line, press available line button (access 1, 2, or 3).
(first party is automatically on exclusive hold) - Dial second party.
- Press flashing line button holding first party.
- Press flashing line button holding party you wish to speak to.
(Other party is automatically on exclusive hold)
Note: If second party is busy or does not answer, disconnect by pressing Clear key. Return to first party by pressing the flashing line button holding first call.
13. Pitch adjustment
This feature allows you to adjust the pitch of your telephone's ring tone to suit your particular needs. To Program:
- Press the program key. (lamp is on)
- Enter 0-9 (pitch is heard as you program)
- Press the program key again. (lamp is off)
14. Ring options
Access 1 & 2 can be programmed for any of the adjustable ringing patterns listed below.
Multiple-Appearance Directory Numbers (MDNS), Hotlines, Intercoms, etc. may be programmed for different ring options.
To program:
Multiple-Appearance Directory Numbers (MDNS), Hotlines, Intercoms, etc. may be programmed for different ring options.
To program:
- Press Program function button. (lamp is on; handset is on hook)
- Press line button to be programmed. (lamp is on)
- Enter one of the following digits (0-6) for desired ring option:
- 0 = Silent (flashes only)
1 = Normal ring
2 = Rings after delay
3 = 2 rings at half volume (continues to flash)
4 = 2 rings at half volume after delay (continues to flash)
5 = Automatic loudspeaker connection (auto answer function button must be activated for use)
6 = Automatic loudspeaker connection (no function button required)
- 0 = Silent (flashes only)
- Press line button being programmed. (lamp is off)
- Press Program function button to complete entry. (lamp is off)
- Press Program function button. (lamp is on)
- Press line button, option number appears in display.
- Press Program function button to clear display.
15. Speed dialing
This feature allows one-key access to numbers of up to 20 digits including Authorization Codes, Feature Access Codes, and Call Access Codes.
To store:
To store:
- While on hook, press the Program key (lamp is on).
- Press vacant function button to be used to store desired number (lamp is on).
- Enter number (include access code if required).
- Press function button (lamp is off).
- Press Program function button to complete entry (lamp is off).
- Press function button that represents stored number. (an access line is automatically activated)
Note: Vacant function buttons can also be used to store feature codes, such as last number redial (***), call pickup (14), call diversion/ follow-me, etc. To program, follow the same steps as above.
16. Multiple appearance directory numbers
- Allows the same directory number to appear on multiple digital telephones.
- Other members cannot access the MDN when it is in use (lamp on).
- When you receive an incoming call on an MDN, the MDN lamp will flash and your telephone will ring in accordance with the Ring Option programmed for the MDN.
- Lift the handset, press the MDN key and dial.
or - Press the MDN key (lamp on) and dial.
- Lift the handset and press the MDN key.
or - Press the MDN key.
17. Call diversion (DBC 203 and 661 only)
Call Diversion: Allows rerouting of all calls to one of ten 9-character diversion message (seen when your station number is dialed).
| 1 | Diversion message. | Once the ten 9-character diversion message is seen when your station number is dialed.
|
| 2 | Calling Station. | The call will be diverted directly to the preprogrammed answering-point if the calling station is:
|
| 3 | Answering-point display. | A digital telephone answering-point with display will receive your:
|
| 4 | Programming date and time with diversion message. | In addition to the message, you can program date or time to your diversion message. You can program:
|
| 5 | To activate. |
|
| 6 | To cancel. |
|
The following represents the default indications for the diversion message digits:
| Number | Message | Date/ Time |
|---|---|---|
| 1 | Lunch | Time |
| 2 | Out: Day | Date |
| 3 | Out: Bus (Business) | Time |
| 4 | Meeting | Time |
| 5 | Bus. Trp (Business Trip) | Date |
| 6 | Absent | Date |
| 7 | Vacation | Date |
| 8 | Out: III | Date |
| 9 | Seminar | Date |
| 0 | Jury Duty | Date |
18. Soft keys (DBC 203 and 661 only)
| 1 | Soft key buttons. | F1, F2, F3, F4 (Soft keys) are used to activate feature options based on the current call state. |
| 2 | Display. | Feature options for each call will be shown automatically in the bottom row of your display. |
| 3 | To use soft keys. |
|
19. Using soft keys for different call states (DBC 203 and 661 only)
| Current call state | Features requiring additional action | |
|---|---|---|
| When your telephone is idle. | F1 LOCK | N/A |
| F2 ACC | N/A | |
| F3 AUTH | N/A | |
| F4 TIMER | Press to use the timer feature. | |
| While in conversation. | F1 ETE | Press to activate send additional digits |
| F2 ACC | N/A | |
| F3 CONF | Press to initiate a conference. | |
| F4 TIMER | Press to use the timer feature. | |
| After dialing a free internal station. | F1 CAB | Press to activate automatic callback |
| F2 | ||
| F3 | ||
| F4 TIMER | Press to use the timer feature. | |
| After dialing a busy internal station. | F1 CAB | Press to activate automatic callback |
| F2 CAW | Press to send call waiting tone. | |
| F3 CUP | Press to activate call pick-up. | |
| F4 TIMER | Press to use the timer feature. | |
| After dialing a station that has activated the diversion message feature. | F1 | |
| F2 | ||
| F3 | ||
| F4 CWF | Press to call the called stations answering-point. | |
| After dialing a busy data extension. | F1 | |
| F2 | ||
| F3 | ||
| F4 CWF | Press to activate connect when free. | |
20. Timer (DBC 203 and 661 only)
| Soft key button | Function |
|---|---|
| F1 START (STOP) | To start or stop the timer. |
| F2 RST | To reset the timer. |
| F3 TIME (DATE) | To display the timer or current date. |
| F4 EXIT | To exit the timer feature and return to the main menu. |
For more information, contact the IT Services Customer Support Service Team at (858) 534-4277. For troubleshooting, contact the ITS Service Desk, (858) 246-4357 or ext. 6-HELP.