How to Print From ISIS
Last Updated: May 12, 2021 8:35:29 AM PDT
Give feedback
The following instructions show you how to print a document from ISIS (Integrated Student Information System).
This example shows how to print a student transcript. If you need to print a different type of document, the steps may vary slightly.
1. Log onto the mainframe.
- You must have a user ID and password to log onto the mainframe. If you don't yet have a user ID and password, contact your departmental security administrator (DSA).
- Select ISIS from the main menu.
- Press Enter.
2. Begin the printer setup selection process. (Unless you change printers in the future, this is a one-time setup.)
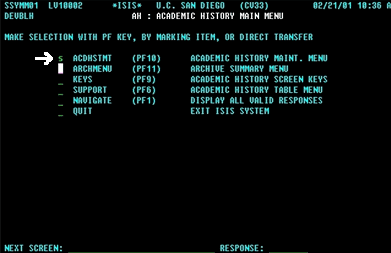
- Follow the directions on the screen to choose the module you want to print from. In the example below, AH (Academic History) has been selected.
- Press Enter.
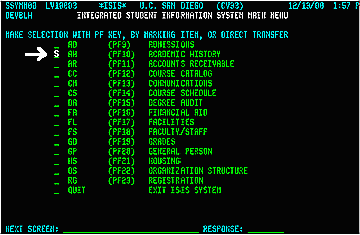
Note: Use the PF8 key to page down a list to get to the item you want to select.
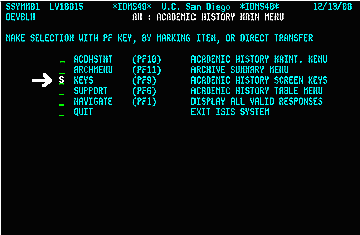
3. Select the KEYS screen to enter the printer ID.
- Follow the directions on the screen to make your selection. In the example below, KEYS (Academic History Screen Keys) has been selected.
- Press Enter.
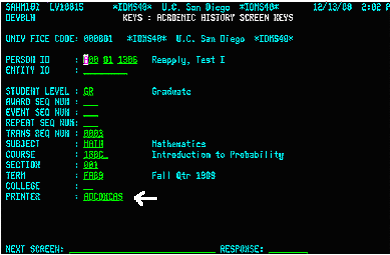
4. Specify the PRINTER ID.
- Enter the name of the printer you wish to print from in the PRINTER field. In the screen below, the printer is ADCOMCAS.
- Press Enter to store the information.
- Go to the NEXT SCREEN field at the bottom of the screen and enter ISIS. (This step is not shown on the graphic below.)
- Press Enter to return to the ISIS main menu.
Note: In the future, to print from other modules, repeat steps 2 through 4.
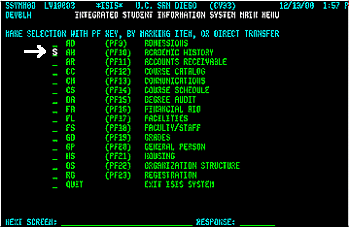
5. Select the module for printing.
- Follow the directions on the screen to choose the module that contains the type of document you want printed. In the screen below, AH (Academic History) has been selected; this module contains student transcripts.
- Press Enter.
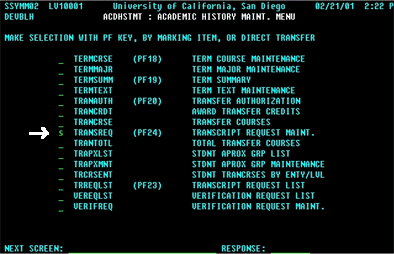
6. Select the ACADEMIC HISTORY MAINTENANCE MENU.
- Follow the directions on the screen to choose ACDHSTMT, as shown in the example below.
- Press Enter.
7. Choose the report you want to print.
- Follow the directions on the screen to choose Transcript Request Maintenance, as shown in the example below.
- Press Enter.
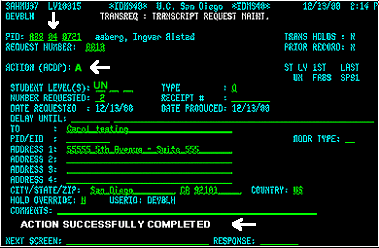
8. Add a transcript request.
- A student's name will automatically appear on the screen. If you want to request the transcript for a different student, enter the student's Personal Identification number (PID) in the appropriate field, as shown below.
- In the ACTION field, type A.
- Press Enter.
- The message ACTION SUCCESSFULLY COMPLETED will appear near the bottom of the screen.
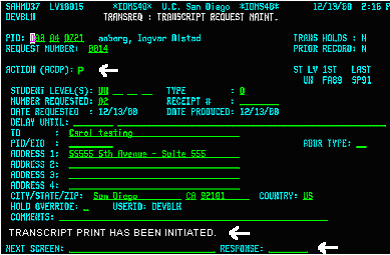
9. Print the report, which in this case is the transcript.
- In the ACTION field, type P.
- Press Enter.
- The message TRANSCRIPT PRINT HAS BEEN INITIATED will be shown near the bottom of the screen, indicating that the transcript has been printed.
- To exit ISIS, type QUIT in the RESPONSE field at the bottom of the screen.
Remote Printer setup
You can request a remote printer be setup by sending an e-mail to acthelp@ucsd.edu with the IP address of the printer and its physical location (building, room number). Once a remote printer has been setup, it will be designated a 'U' number (U123, U678, etc.). If you encounter issues with the printer after it has been setup. You can send an email to acthelp@ucsd.edu, along with the printer U number and the issue can be researched.
For more information, contact the systems administrator in your department.