How to Trim Your Video in MediaSpace
MediaSpace has a basic video editor that allows you to make cuts to your video. Here’s how to use it.
Kaltura provides media owners (and co-editors) the ability to use the Video Editor. Within this editor, you can perform two main functions: making cuts to your video and adding in-video quiz questions. In this tutorial we'll go over all the functions you can perform in the main editor.
What Kinds of Cuts Can You Make to a Video in Kaltura?
The Kaltura Video Editor allows you to do a handful of things, such as:
- Set a new point where your video should start
- Set a new point where your video should end
- Remove sections of video from the middle of your video
- Add fade-ins and fade-outs to any section you generate on the timeline
You can elect to save your changes and override the previous version of the video, or you can save the changes as a new copy of the video. (We generally always recommend the latter, since you can't restore any changes you make to the original if you save over it.)
How to Make Cuts
- If you're not already logged into MediaSpace, go to https://mediaspace.ucsd.edu, click the profile icon at the top right of the screen and select "Login." Enter your active directory credentials.
- Click the profile icon again and select "My Media."
- Identify the video you’d like to edit and click the pencil icon located to the right of it.
- Click "Launch Editor."
 There are three main types of cuts that you can make.
- Setting a new start point (trimming off the beginning)
- Setting a new end point (trimming off the end)
- Cutting out pieces of your video in the middle
Setting a new start point
- Under the video preview, click on the timeline where you'd like your video to begin. (For more precision, zoom in on the timeline using the "Timeline Zoom" slider on the lower right side of the window.)
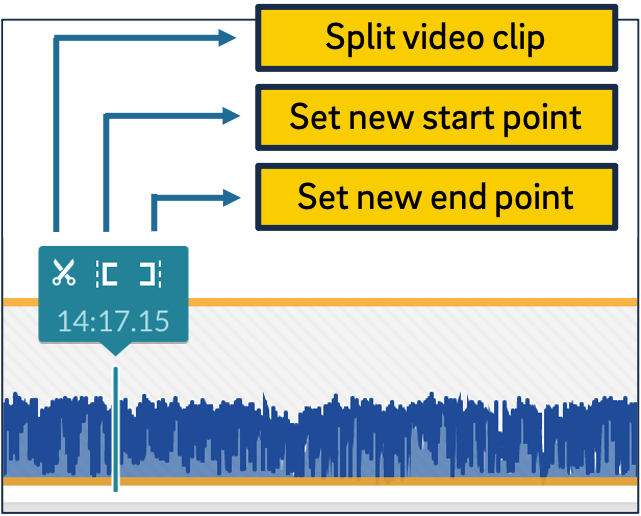
- On the blue-ish box just above where your cursor is on the timeline, click the icon that looks like a left bracket (" [ "). The timeline before your cursor should become greyed out.
Setting a new end point
- Under the video preview, click on the timeline where you'd like your video to end. (For more precision, zoom in on the timeline using the "Timeline Zoom" slider on the lower right side of the window.)
- On the blue-ish box just above where your cursor is on the timeline, click the icon that looks like a right bracket (" ] "). The timeline after your cursor should be replaced with diagonal grey lines.
Removing parts of your video in the middle
- Locate the point in the timeline that's the start point of the clip you want to remove. (For more precision, zoom in on the timeline using the "Timeline Zoom" slider on the lower right side of the window.)
- Click the scissors icon ("Split") in the blue box above your cursor on the timeline. This turns your existing video into two separate clips.
- Click on the timeline where the end point of the portion of the video you'd like to remove is.
- Click the scissors icon ("Split") in the blue box above your cursor on the timeline. Now your video is divided into three clips: the beginning, the part in the middle you want to remove, and the end.
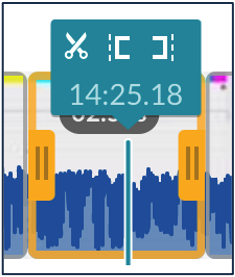
- Click anywhere within the clip in the timeline that you want to remove. The selected clip will have a yellow outline around it.
- Click the trashcan icon above the timeline. The selected clip should be replaced with diagonal gray lines, indicating it's been removed.

Editing Kaltura Capture Recordings
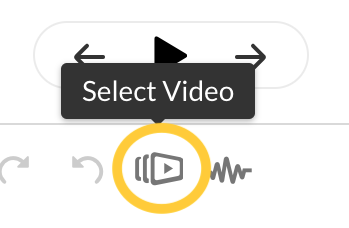 If you're editing a Kaltura Capture recording that has 2 or more video streams (such as your camera and the screen capture), you can select which video stream you'd like to see in the video preview window. It may be easier, for example, to identify where to cut your video based on your camera feed instead of your screen feed - or vice-versa. Regardless, to change the video feed in the preview window, click the icon above the timeline that looks like a stack of rectangles with a triangular play button on top. You'll be presented with the available video streams you can select.
Note that you are not able to cut parts of only one stream. If you make any cuts, it will apply to all streams of a Kaltura Capture recording.
Saving your edits
- Click "Save a Copy."
"Save" vs. "Save a Copy"
When saving the edits you've made to a video, you have two options.
- Save will overwrite the original video, and the deleted portions of your video will not be recoverable.
- Save a copy will create a new entry in Kaltura, leaving the original video intact.
- Enter a name for your new clip. We recommend naming your original and edited videos differently so they're easy to identify in "My Media."
- Wait for the changes to be saved and click "OK." Note that when edits are saved, the video will need to be re-processed, and will not be available immediately.
Tip
Though in many applications it makes sense to save frequently, you should only save your edits when you're done making them. If you click "Save" before you're done, your video will enter a processing mode and will be unavailable for editing for some time. If you click "Save a Copy" you'll be creating a new video in "My Media" that will also need to be processed and will not have all of your desired edits. Accordingly, make sure you have enough time to finish your edits when you begin!How to Add Fade-Ins and Fade-Outs
Within the video editor, you can also apply fade-in and fade-out effects to any selected clip.
- Within the Video Editor, click on any of the discrete clips that you've made (or just click the unedited clip in the timeline if you just want to add a fade-in or fade-out to the original unedited video). The selected clip will be outlined with a yellow box and will have yellow tabs (or "curtains") on either side.
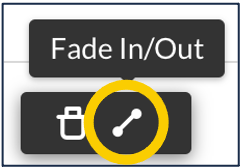
- With your clip selected, click the Fade In/Out icon above the timeline, which looks like a diagonal line with balls on either end.
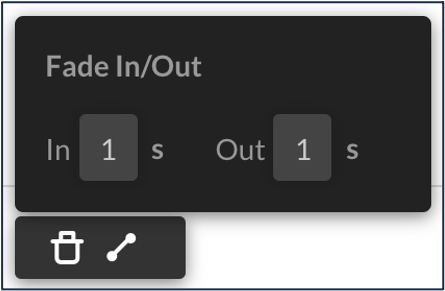
- Within the "Fade In/Out" box that appears, identify in seconds how long you'd like either transition to take. (If you're not sure, just enter 1 second, which is a fairly typical length for a fade in or fade out.) If you don't want one of the transitions (i.e. you only want a fade in or a fade out), just leave the time of the other at 0.
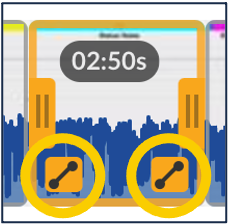
- Click anywhere in the window outside of the Fade In/Out box and your transition will be saved. You'll be able to tell it was applied if you see the Fade In/Out icon on the side(s) of your clip.
Notes on Fade-ins and Fade-outs
- When you play back your video within the editor, the fade ins/outs may not display properly. You'll need to save your clip and wait for it to process in order to see your changes.
- Fade-in and fade-outs apply to your video only; they don’t affect the audio.
Editing Tips
Here are a few tips about using the Video Editor In MediaSpace.
Click "Save a Copy" rather than "Save"
We've said it before, but it bears repeating: we strongly recommend that you save a new copy of your video with the edits. To be clear, this is what happens when you save a copy of your video:
- A new video entry will be added to "My Media."
- A new caption request will be generated. (So if you’ve already edited your captions, you can just delete the new set when it arrives.)
- The new video will be processing for a while and unavailable for publishing or editing.
- Your original video will be available for any separate editing job you wish to do, publication, etc.
Now, chances are you're removing parts of your video that you definitely won’t need in the future, but it’s just safer to save a new copy. In case something goes wrong with your edits on the back end, it’s nice to have a backup (albeit unedited). Just be sure to come up with a naming convention that makes sense to you.
Leverage the Timeline Zoom Slider
Towards the lower right corner of the editor, there’s a slider control that allows you to zoom in and out on the timeline. Zooming in can help you find the part of your video you want with more precision. Using the Video Editor can be like doing surgery with a steak knife, so the more precision you can get, the better.
One odd thing about the timeline zoom is that it appears to be relative, not absolute. That is, you'll be able to zoom in far, far more on a short video than you will with a long video. That's another argument in favor of making shorter videos!
Frequently Asked Questions (FAQs)
Use the list below to jump to the answer.
- What happens to my captions when I make edits to a video?
- Can I trim just one video stream from a Kaltura Capture recording?
What happens to my captions when I make edits to a video?
Answer: They will be trimmed along with your video and the timings should remain accurate. If you "save a copy," the trimmed captions will be present but a new request for machine captions will be submitted.
When you’re done editing your video, your existing captions will be cut appropriately. That said, it never hurts to do a spot check around the points of your edits to ensure that everything looks good.
If you clicked "save a copy" (as we recommend), a new copy of the video is created. All new videos in Kaltura generate a request for machine captions, so you should expect an additional caption track to be added to your video. Provided that you have existing captions that are accurate, you can delete this additional track if wish.
Can I trim just one video stream from a Kaltura Capture recording?
Answer: No.
Unfortunately, cuts performed to a Kaltura Capture recording affect all the video streams. (So you can’t, say, cut off the stream of your screen a minute before the end of your video - you’d also have to cut the camera/audio for that minute.)