Electronic Grades (eGrades)
This step-by-step guide explains how to submit electronic grades using the web-based eGrades tool.
About eGrades
eGrades is a secure web-based application that allows instructors to submit or change final grades for the students in their courses. The eGrades system was introduced to the UCSD campus in the Spring 2012 quarter and has successfully replaced the scantron method of grade collection.
1. Before you get started
- All users must sign in using UC San Diego’s business systems via Single Sign-On (SSO).
- Instructors of Record (IR) in the Schedule of Classes can access eGrades with their SSO.
- If you are unsure whether or not you have SSO access, you can self-register online. You'll need to provide:
- Your UCSD e-mail address
- Your employee ID number (found on your paystub or UCSD ID card)
- The last 4 digits of your SSN
- Your birthdate
- eGrades provides instructors with the ability to designate active UCSD employees or students as Authorized Graders (AG). However, it also requires that people chosen to serve as AGs have approved access to UC San Diego’s business systems. Contact your department’s DSA for approved access and information in order to assign the proper role for eGrades.
- Look up your department DSA using your UCSD e-mail.
- If you are your department’s DSA and you have questions about this process, contact act-access@ucsd.edu.
2. Timelines and deadlines
- See the current eGrades calendar.
- The Instructor of Record may designate an Authorized Grader at any time during the current quarter.
- You may only submit grades during the open grading cycle dates for each term. See the current eGrades calendar for upcoming grade entry periods.
- After the deadline for the current term, there is an “unavailable” required for other end-of-term processing. On this day, no grades can be entered or changed for any term.
- Sections not submitted by the closing deadline will be recorded with blank grades, which will lapse to a failing grade after one quarter.
- Students may be placed at a disadvantage in competing for financial scholarships or for admission to another institution if final grades are not recorded promptly at the end of the quarter.
- A Late Grades Report will be available for viewing on TritonLink.
- Once grades for a section have been submitted, eGrades allows grade changes for that section for up to one year.
- After the grading cycle closes, grades can only be entered as grade changes. For details, see the Grade changes section below.
- Notifications and reminders will be sent to instructors during the grading cycle.
- Summer Session timelines are based on the same relative time frames as other quarters. The same grade-change principles apply.
- The time frames for School of Medicine and School of Pharmaceutical Sciences will be adjusted to accommodate their requirements. The same grade-change principles apply.
3. eGrades access
eGrades is compatible with Internet Explorer and Mozilla Firefox.
To access eGrades from Blink:
- Go to blink.ucsd.edu
- In the toolbox, click on Instruction Tools and eGrades
- Sign in using your Single Sign-On user name and password
To access eGrades directly:
- Go to egrades.ucsd.edu
- Sign in using your Single Sign-On user name and password
4. eGrades tutorials
eGrades Tutorial (PDF)
eGrades Import Tutorial (PDF)
Be sure to review the eGrades Tips and Frequently Asked Questions.
5. Designate an authorized grader
eGrades allows Instructors of Record to designate another person to help them enter grades into the application. This role is called the Authorized Grader (AG).
Any current UCSD faculty, staff, or student can be designated as the AG for a section, as long as they have DSA-approved access to UCSD's business systems.
Many faculty and staff already have this access with their Single Sign-On (SSO); however, many students do not.
If you are planning to designate a student as an AG, it is best to notify your departmental DSA early if your AG needs access. AGs are assigned to individual section numbers and must be re-designated every term.
AGs are limited to entering grades during the initial submission period. They may not enter grades past the deadline, nor are they ever allowed to file grade changes.
Once an AG finishes entering grades, the section must be reviewed and submitted by the Instructor of Record.
To add an Authorized Grader:
- Sign in to eGrades.
- Click Designate Authorized Grader (it appears below the list of sections).
- Use the drop-down box to select the section for which you are designating the AG.
- Click Add Grader.
- Enter search information for the person you wish to designate.
- You must search using at least one of the search fields.
- When searching by e-mail, you must know the person's complete UCSD e-mail address.
- Searching by department name requires using the name of the department as it is listed in the UCSD directory.
- Click Search.
- If the person you wish to designate appears, check the box next to their name, then click Update.
- If the person you wish to designate does not appear, check your information and try again. If your information is correct, check with your department's DSA to ensure that your AG is approved for access to UCSD's business-level systems.
6. eGrades direct submission
- Once you sign in, you'll be on the Section List screen.
- This screen lists all of the sections you are authorized to access, chronologically, beginning with the current term and going back up to one calendar year.
- Use this screen to choose the section for which you want to enter grades.
- Click Enter Grades from the section list to go to the Grade Entry screen.
- Use the Grade Entry screen to enter grades for the section.
- To enter grades, use the drop-down boxes. Only grades allowed by a student's grading option can be entered.
- Incomplete (I) and Pending Academic Dishonesty (X) can also be entered.
- An appropriate reason is required for the Incomplete. If the Incomplete is not replaced with a final grade, it will lapse to a Failing Grade after one term. An EPC approved petition is still required to request an extension for an Incomplete.
- Blank grade ( ) is also permitted, but lapses to a Failing Grade after one term.
- If you want to stop and finish a section later, click the Save button. eGrades will save your work so far, even if you log out, so that you can continue later. The Cancel button returns you to the section list, but you'll lose all unsaved work on the section.
- Once you have entered all grades for the section you want to submit, click Save & Review.
- To enter grades, use the drop-down boxes. Only grades allowed by a student's grading option can be entered.
- Use the Grade Review screen to:
- Review the grades that you have entered.
- Download a PDF file of the grades you are submitting, for your records.
- Confirm that the grades have been entered according to University policies.
- Submit the grades for overnight upload to the student information system (ISIS). Grades that have not been submitted will be deleted on the Blackout Day.
- Remember that after you hit Submit, the final submission of grades is permanent. Once grades are uploaded overnight to ISIS, grades can only be changed as a Grade Change on the following day (see instructions below).
7. eGrades import submission
The eGrades import function allows you to import a section's grades into eGrades instead of entering them manually one at a time.
See the eGrades Import Tutorial (PDF) for more details about the steps below.
To begin, you need to have a file to import. There are 2 places where you can download a pre-formatted file (the recommended method), or you can create your own file.
Download a pre-formatted file:
To download pre-formatted files using the Class Lists tool (login required):
- From the Class Lists page, enter the section number and follow the prompts to download the file.
- ESPP or Extension students appear at the bottom of this file. It may be helpful to sort the file alphabetically before you start entering data.
- Your downloaded file will be a .txt Tab Delimited file. See notes below for details on file types.
Or, download populated and pre-formatted files from Canvas. You can find instructions for exporting grades from Canvas on Ed Tech's End-of-Term Checklist.
Notes about downloaded file types:
- eGrades can only upload files that are saved as Tab Delimited text (.txt) files or Comma Separated Value (.csv) files.
- eGrades cannot import Excel (.xls or .xlsx) files, or any other type of file.
- Any Excel file can be converted to a .txt or .csv file by choosing Save As within Excel, and then selecting Text (Tab Delimited) or CSV (Comma Delimited) from the Save as type: drop-down box.
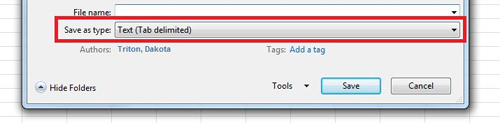
- If you download a file from the Class Lists tool or from Canvas, but work with the file in Microsoft Excel, be sure that you have saved the file as either Text (Tab Delimited) or CSV (Comma Delimited) before you import the file within eGrades.
- Microsoft Excel is the recommended program for working with these files, but if you edit your files in Excel, you will be asked to verify the file type when you are opening or saving the file, and you should answer "Yes" to these pop-up windows.
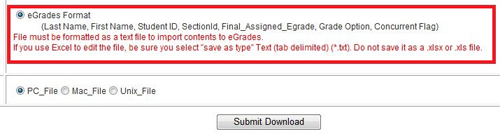
| Last Name | First Name | Student ID | SectionId | Final_Assigned_Egrade |
|---|

Notes for your file headers:
- Use a space between the words Last Name, as well as between First Name and Student ID.
- The second I in SectionId is capitalized.
- Use an underscore character (_) between Final_Assigned and between Assigned_Egrade.
- It does not matter what order the columns are placed, or if there are any extra columns of data in the file.
Add data to your file
Once you have downloaded or created your file, it's time to add the data. If you downloaded your file from the Class Lists tool or from Canvas, most of this data will already be in the file.
If you downloaded the file from the Class Lists, then the only missing information is the Final_Assigned_Egrade, which is the final grade you're assigning to each student. You can type this manually, or cut and paste from a separate file.
If you downloaded the file from Canvas, and your grade sheet was complete, all of the information should be complete in the file, and you can go directly to eGrades.
If you created your own file, you'll need to fill in the information for all of the required columns.
Import your file into eGrades
Once your file is ready, and is saved in the correct format, you're ready to log into eGrades.
- Select the section that you are importing from the Section List screen.
- From the Grade Entry screen, choose Import File.

- Follow the pop-up prompts. Begin by clicking on either Tab Delimited or CSV Delimited, depending on the format of your file.
- Next, click Browse, and navigate to where you have the file stored on your computer.
- Select the file and click Submit.
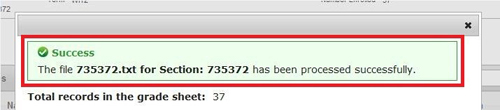
- If your file was error-free, you'll get a success message.
- If you file has errors, you'll get an error message.
- If your file failed to import, it might be because your file is not saved in the proper format (Tab Delimited text (.txt) or as Comma Separated (.csv)), or because your column headings are incorrect. Fix the problem in your file, re-save, and try the import again.
- If your file was a partial import and only some of the grades were imported, this is probably because you have a different number of students in the file than eGrades is expecting, you have the same student in the file more than once, or because the data is not formatted correctly in one of the rows. In these cases, eGrades tells you which students were not imported and why.
- You can fix these errors in the file and re-do the import (better if you have many errors), or you can continue and fix the errors within eGrades (better for fewer errors).
8. Grade changes
Note: Grade changes for Extension students must be handled directly through Extension.
- Once you sign in, you'll be on the Section List screen.
- This screen lists all of the sections you are authorized to access, chronologically, beginning with the current term and going back up to one calendar year.
- Use this screen to choose the section for which you want to change grades.
- Click Grade Change from the section list to go to the Grade Change screen.
- Use the Grade Change screen to change grades for the section.
- You can change the grades for multiple students in the section at the same time.
- Note that the reason for the grade change is pre-populated.
- If you want to stop and finish a section later, click the Save button. eGrades will save your work so far, even if you log out, so that you can continue later. The Cancel button returns you to the section list, but you'll lose all unsaved work on the section.
- Once you have entered all of the changes you are making, click Save & Review.
- Use the Grade Review screen to:
- Review the grades that you have entered.
- Download a PDF file of the grades you are submitting, for your records.
- Confirm that the grades have been entered according to University policies.
- Submit the grades for overnight upload to the student information system (ISIS).
- Previous Term Grade Changes
- Once submitted, the grades are uploaded to ISIS overnight and will be visible to students the following day.
- Filing a grade change for a previous term automatically generates an e-mail that is sent to the students whose grades have changed, to you for your records, and to the department chair, in lieu of the chair’s signature. This process replaces the Clerical Error Form.
- Authorized Graders may not file Grade Changes.
- Current Term Grade Changes
- The final submission of grades is permanent. Once grades are uploaded to ISIS, they may no longer be entered through eGrades. Only a Grade Change may be entered.
- As a result, there may be times when you need to file a grade change for grades in the current term that you have already submitted.
- This is done the same way as a grade change for a previous term. Notification e-mails are not sent for current term grade changes during the grade cycle.
- Authorized Graders may not file Grade Changes, even for current terms.
Contact information
If you have any remaining questions, comments, or concerns regarding eGrades, contact:
- Academic Records
- Phone: (858) 534-3144
- E-mail: egrades@ucsd.edu
- Hours: Mon., Tues., Wed., Fri., 8 a.m. – 4:30 p.m. Thurs. 10 a.m. – 4:30 p.m.
- ITS Service Desk, servicedesk@ucsd.edu, (858) 246-4357