Connecting to a University Issued Desktop From a Home Computer
Find out how to use a Remote Desktop application to access your campus computer.
Remote Desktop access has different setup instructions depending on your home and office computer systems. Below are variations to help you remotely access your campus computer.
Note: if your home computer is a PC, you must have Windows 7 or higher, up-to-date antivirus software, and automatic operating system updates enabled.
If you are unable to connect to a UC San Diego computer using Remote Desktop from your personal computer, check that you are first connected to the campus network through the campus VPN.
If you are still unable to connect, contact the ITS Service Desk, (858) 246-4357.
Using a home Windows 7 /10 computer to access a campus PC computer
Use the Remote Desktop Connection option from Windows to access your campus computer.
Step 1: Prepare Windows 7 /10 computer for remote access
- Open the Settings app
- Click the System category
- Click the Remote Desktop page
- Toggle the “Enable Remote Desktop” button to the “On” position *
*This might already be set for Remote Desktop and greyed out. If it’s set to off and greyed out, contact us, department policy may be set to disable RDP.
- Click on Power & Sleep and set Sleep to never
- Find the Windows 10 IP address (if you’re unsure of the IP, follow below instructions, otherwise skip step
To find the IP address on Windows 10, without using the command prompt:
- Click the Start icon and select Settings
- Click the Network & Internet icon
- To view the IP address of a wired connection, select Ethernet on the left menu pane and select your network connection, your IP address will appear next to "IPv4 Address"
- Connect to the UC San Diego Cisco VPN
Step 2: Connect remotely to campus computer
- Connect to the campus VPN.
- Click the search bar on the Taskbar
- Type "remote desktop": A list of search results appears
- Click Remote Desktop Connection
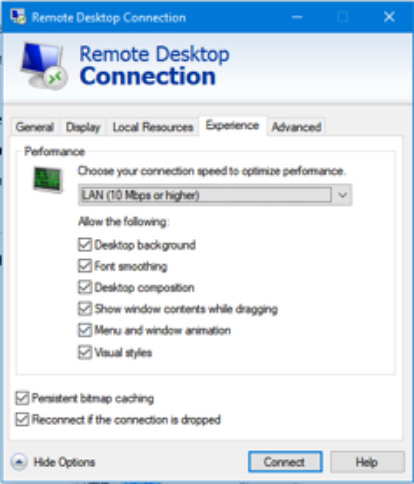
- Click on Show Options
- Click on the Experience tab
From the drop-down menu, select LAN (10 Mbps or higher)
- Click Connect
Windows initiates the remote connection; then you will be asked to enter your AD credentials - Enter the AD username and password that you use on the computer you’re connecting to; then click OK
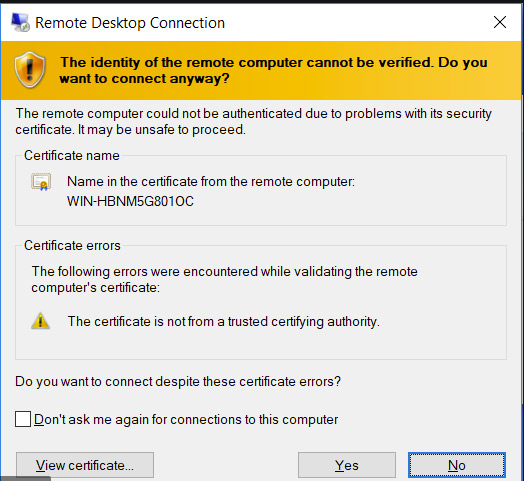
- If you’re informed that the remote computer couldn’t be authenticated due to problems with its security certificate, click Yes to connect anyway

You’re now connected to the UC San Diego remote computer and can use it as though it were your local computer
Trouble shooting
If Remote Desktop Connection says that it can’t connect to the remote computer, check the following:
- Make sure you are connected to the campus network using the campus VPN
- That the remote computer is turned on (powered On)
- The remote computer is available on the network
- The remote computer's Windows setting Allow Remote Connections is enabled
Submit a ServiceNow ticket if you are unable to connect to a UC San Diego remote computer using Remote Desktop from your personal computer.
Close the connection
When you finish using the Remote Desktop Connection:
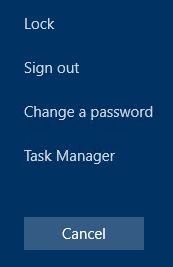
- Press Ctrl Alt End to view the lock, sign out, change password and task manager options on the remote Windows 10 computer

- Close the Remote Desktop Connection app by clicking the X button on the top
- Click OK
The remote session is now disconnected.
Using a home Macintosh to access a campus Windows 10 computer
Use the Remote Desktop Protocol (RDP) App from Mac OS to access a Windows 10 from your Mac computer:
Step 1: Prepare Campus Windows 10 computer for remote access
- Open the Settings app on the campus computer
- Click the System category
- Click the Remote Desktop page
- Toggle the “Enable Remote Desktop” button to the “On” position *
* This might already be set for Remote Desktop and greyed out. If it’s set to off and greyed out, contact us, department policy may be set to disable RDP.
- Click on Power & Sleep and set Sleep to never
- Find the Windows 10 IP address (if you’re unsure of the IP, follow below instructions, otherwise skip steps a-c)
To find the IP address on Windows 10, without using the command prompt:
- Click the Start icon and select Settings
- Click the Network & Internet icon
- To view the IP address of a wired connection, select Ethernet on the left menu pane and select your network connection, your IP address will appear next to "IPv4 Address"
- You should now be able to connect from devices on your local network, using your PC’s IP address or hostname
Step 2: Prepare Mac OS Computer to remotely access a Windows Computer
- If you do not have Remote Desktop for Mac download/install the Remote Desktop app from the Apple App Store
- Connect to the campus VPN.
- If you do not have Cisco VPN app on your Mac computer, download the app.
- Open and setup Remote Desktop app
- In the RDP upper menu, click +, and Add PC
- Enter the following information:
- Enter IP address of the remote UC San Diego Windows
- In the User Account add your UC San Diego login username (ie: AD\username)
- (Optional) Manage your saved user accounts in the preferences of the app
- You can also set these optional settings for the connection:
- Set a friendly name (ie: MY OFFICE PC)
- Enable connect to Admin Mode
- Redirect local folders into a remote session
- Forward local printers
- Forward Smart Cards
- Click Save
Step 3: Connect to remote computer
- Double click Remote Desktop app to start
- Windows initiates the remote connection to the campus computer
- If you created your User Account, it will auto-login
- If not, it will ask for your username/password
- If you are informed that the remote computer couldn’t be authenticated due to problems with its security certificate, click Yes to connect anyway

You’re now connected to the UC San Diego remote computer and can use it as though it were your local computer.
Trouble shooting
If Remote Desktop Connection says that it can’t connect to the remote computer, check the following:
- Make sure you are connected to the campus network using the campus VPN
- That the remote computer is turned on (powered On)
- The remote computer is available on the network
- The remote computer's setting to Allow Remote Connections is enabled
Submit a ServiceNow ticket if you are unable to connect to a UC San Diego remote computer using Remote Desktop from your personal computer
Customize your display resolution
You can specify the display resolution for the remote desktop session.
- In the Connection Center, click Preferences
- Click Resolution
- Click +
- Enter a resolution height and width, and then click OK
- To delete the resolution, select it, and then click - key
Displays have separate spaces If you are running Mac OS X 10.9 and disabled displays have separate spaces in Mavericks (System Preferences > Mission Control), you need to configure this setting in the remote desktop client using the same option.
Use a keyboard in a remote session
Mac keyboard layouts differ from the Windows keyboard layouts.
- The Command key on the Mac keyboard equals the Windows key.
- To perform actions that use the Command button on the Mac, you will need to use the control button in Windows (e.g.: Copy = Ctrl + C).
- The function keys can be activated in the session by pressing additionally the FN key (e.g.: FN + F1).
- The Alt key to the right of the space bar on the Mac keyboard equals the Alt Gr/right Alt key in Windows.
By default, the remote session will use the same keyboard locale as the OS you're running the client on. (If your Mac is running an en-us OS, that will be used for the remote sessions as well.) If the OS keyboard locale is not used, check the keyboard setting on the remote PC and change it manually.
Close the connection
When you finish using the Remote Desktop Connection:
- Press Ctrl Alt Del to view the lock, sign out, change password and task manager options on the remote Windows 10 computer

Select Sign out to log off from the remote Windows 10 computer - Close the Remote Desktop Connection app by clicking the X button on the top
- Click OK