Cleaning Up your Mailbox - Microsoft Outlook 2013
Learn how to clean up your Outlook 2013 mailbox for better performance and to ensure you do not exceed your allocated server space.
Auto Archiving
- AutoArchive will move messages over 6 months old from your mailbox hosted on the Exchange server to a mailbox on your local computer. Please keep in mind archived messages will not be viewable through Outlook Web Access because they are no longer stored on the Exchange server.
Setting up AutoArchiving
- In the main Outlook 2013 window, click on the File tab and click on the Options button. The Outlook Options dialog box will appear.
- Click on the Advanced button in the Navigation pane on the left. The options for working with Outlook will be displayed.
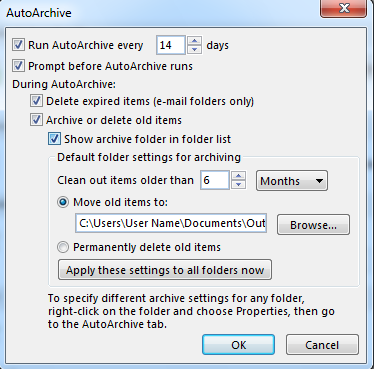
- In the AutoArchive section, click on the AutoArchive Settings button. The AutoArchive dialog box will appear.
Note:
-
If you turn on AutoArchive without changing any of the other AutoArchive settings, Outlook automatically archives items every 14 days, sending items that are over six months old to the archive file listed in the AutoArchive dialog box. For most people, those settings are just fine. Some users prefer to turn off the AutoArchive feature and run the archive process manually, these instructions are shown below. You can turn on or off the AutoArchive process by selecting or deselecting the Run AutoArchive Every check box at the top of the AutoArchive dialog box. You can also change how often AutoArchive runs by replacing the 14 in the text box with any number between 1 and 60.
-
If you filter your mail into multiple folders, you may want to set different AutoArchive schedules for each mail folder. To do this, right click on the email folder, select Properties, and select the AutoArchive tab. Select "Archive this folder using these settings." After you have made the appropriate changes, click "OK" to save the changes.
Manually running Auto Archive
- If you wish to manually run AutoArchive now, go to the File tab from the menu and click on the Info button. This is located on the navigation pane on the left. Select the Cleanup Tools button and click on the Archive button.
Accessing the Archived Items folder
- The Archived Folders will not appear until you have successfully archived your old messages for the first time.
- To Find and view an archived item, click on the File tab from the menu and select Open & Export on the left pane. Click on the Open Outlook Data File button. The Open Outlook Data File dialog box will appear. Select the file you want to open. The file you select will appear in the File Name text box. Click on the Ok button. The name of the data file you opened will appear in the Navigation pane, below your normal set of folders.
- To find out the name of the archive data file to open, click on the File tab. Click on the Info button in the Navigation pane on the left. Select the Cleanup Tools button and proceed with clicking the Archive button. Look in the Archive File text box. Don’t change anything about the information; otherwise, Outlook may start sending your archived items someplace else. The information in the Archive File text box is usually complex gobbledygook with colons and slashes and all sorts of stuff that normal people can’t remember.
- To close the archive data file, in the Folder pane, right-click the name of the archive data file. A shortcut menu will appear. Choose Close Archive. The archive data file might be called something other than archive — if so, the name of your particular archive data file will appear instead of the term archive. Your archive folder disappears from the Navigation pane.
Emptying out your Deleted Items folder
- Before you empty out your Deleted Items, if you accidentally deleted a message you didn't want to lose. Click on the Deleted Items folder. You'll find all the messages you've deleted in the last few months (unless you've emtped the Deleted Items folder). To recover a deleted message, just drag it from the Deleted Items list to the icon for whichever folder you want to put it in.
- To empty out your Deleted Items folder, right-click on the Deleted Items folder and select Empty Folder.
- To set Outlook 2013 to empty your Deleted Items folder on exit, go to the File tab and click on Options. On the Advanced tab, under Outlook Start and Exit, select the Empty Deleted Items Folder Upon Exiting check box. To be notified before the Deleted Items folder is emptied automatically, click on the Advanced Tab, under Other, select the Prompt for Confirmation Before Permanently Deleting Items check box.