Hotspots
Hotspots can be a handy feature in certain circumstances. Here’s how to create and use them.
As of 18 November 2021, UCSD Kaltura users are able to add hotspots to their videos. The hotspot editor can be found within the main Video Editor. Read the instructions below to learn how to add them to your own videos.
What's a Hotspot?
A hotspot is a textbox that you can display on top of your video for a length of time that you determine. There are two different kinds:
- A "URL" hotspot, allowing you to present viewers with a clickable link
- A "time in this video" hotspot, allowing users to jump to a different part of the video
How to Add a URL Hotspot
A URL hotspot puts a textbox onscreen. When viewers click it, they'll be taken to the website you've identified in a separate browser tab or window. The video will also pause if it's not already paused.
- Within Canvas, click "My Media" in the left navigation.
- Locate the video to which you want to add Hotspots and click the pencil icon on its row.
- Click "Launch Editor" in the gray box next to the video player. The Kaltura Video Editor will launch.
 In the left navigation of the Video Editor, click the icon that looks like an arrow within a square.
- Use either play controls within the video player or the timeline below to find the place in your video where you want the hotspot to first appear onscreen for viewers, and click the "Add Hotspot" button.
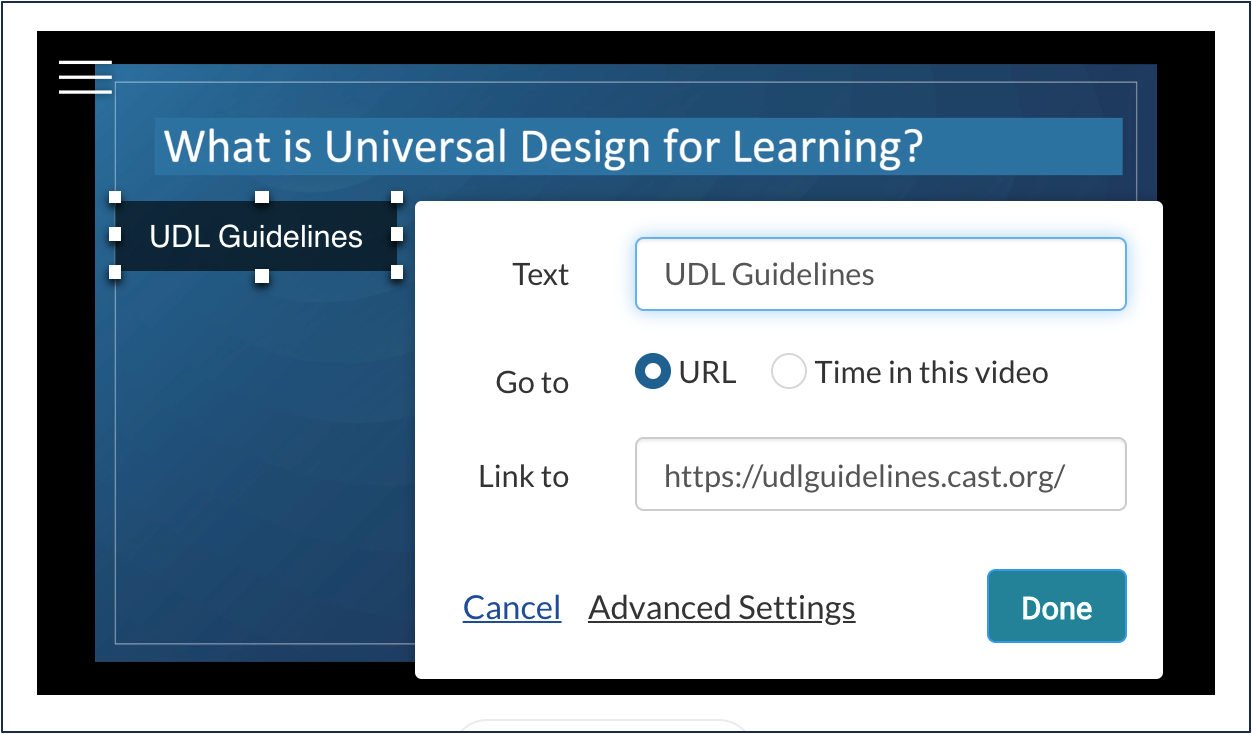 Enter the text you want to display onscreen in the "text" field.
- Ensure that the "URL" radio button is selected.
- Enter the URL in the "link to" field, including the
https://prefix. - Click "Done." (If you want to explore the "Advanced Settings," read below.) You should now see a little yellow box has appeared above the timeline at the bottom of the Video Editor, and above the timeline.
- Position the hotspot within the player window by dragging and dropping it where you see fit. You can also enlarge the box, though this won't change the font size.
- Play the video or use the scrubber in the timeline to find the time in the video when you no longer want the hotspot to be onscreen for viewers. Drag the right side of the yellow box that's above the timeline to that desired endpoint.

- Click "Save" at the top right of the Video Editor window.
Advanced Settings
You have additional configuration options for your hotspots that you can access by clicking "advanced settings" when an existing hotspot is selected in the Video Editor. In addition to being able to change the text and link or timecode (depending on the type of hotspot), you have control over the look and feel.
Styles
- Text Color & Style allows you to change the color and weight of the text (weight being whether it's bold, thin, or "normal").
- Text Size allows you to change the size of the text.
- Roundness affects the corners of the textbox. The higher the number, the more rounded the corners become.
- Background color allows you to affect two properties of the textbox: the color and its transparency.
- Position allows you to articulate specific x and y coordinates for the textbox, if you'd rather use hard numbers rather than dragging and dropping it in the preview video window.
- Size allows to articulate the specific size of the textbox, if you'd rather use hard numbers rather than dragging and dropping it in the preview video window.
Timeline
- Start time and end time allow you to enter mm:ss timecodes for the starting and ending points for when the hotspot will be visible manually, rather than having to use the yellow "curtains" above the timeline.
Creating Non-Clickable Text Boxes
You can actually put plain text onscreen (that's not a link) by adding a URL hotspot, and just not filling out the URL field. That makes it seem like less of a "hotspot" and more of a "label," but that could still provide useful in a variety of circumstances.
How to Add a "Time in This Video" Hotspot
A "time in this video" hotspot allows viewers to jump back to a timecode that you identify in your video.
- Within Canvas, click "My Media" in the left navigation.
- Locate the video to which you want to add hotspots and click the pencil icon on its row.
- Click "Launch Editor" in the gray box next to the video player. The Kaltura Video Editor will launch.
- In the left navigation of the Video Editor, click the icon that looks like an arrow within a square.
- Use either play controls within the video player or the timeline below to first find the point that you want viewers to jump back to using the hotspot. Take note of the timecode.
- Use either play controls within the video player or the timeline below to find the place in your video where you want the hotspot to first appear onscreen for viewers, and click the "Add Hotspot" button.
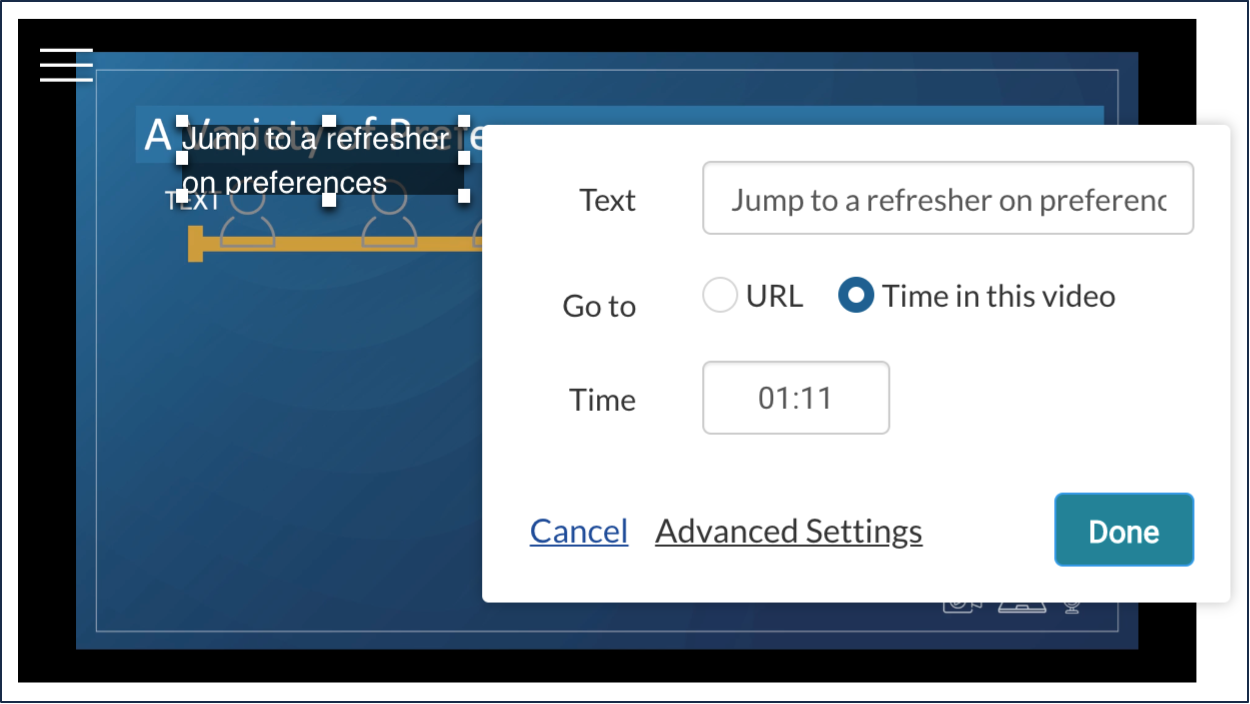 Enter the text you want to display onscreen in the "text" field.
- Ensure that the "time in this video" radio button is selected.
- In the "time" field, enter the timecode you noted earlier, in 2-digit minutes and 2-digit seconds (mm:ss).
- Click "Done." (If you want to explore the "Advanced Settings," read below.) You should now see a little yellow box has appeared above the timeline at the bottom of the Video Editor, and above the timeline.
- Position the hotspot within the player window by dragging and dropping it where you see fit. You can also enlarge the box, though this won't change the font size.
- Play the video or use the scrubber in the timeline to find the time in the video when you no longer want the hotspot to be onscreen for viewers. Drag the right side of the yellow box that's above the timeline to that desired endpoint. Click "Done."
Advanced Settings
You have additional configuration options for your hotspots that you can access by clicking "advanced settings" when an existing hotspot is selected in the Video Editor. In addition to being able to change the text and link or timecode (depending on the type of hotspot), you have control over the look and feel.
Styles
- Text Color & Style allows you to change the color and weight of the text (weight being whether it's bold, thin, or "normal").
- Text Size allows you to change the size of the text.
- Roundness affects the corners of the textbox. The higher the number, the more rounded the corners become.
- Background color allows you to affect two properties of the textbox: the color and its transparency.
- Position allows you to articulate specific x and y coordinates for the textbox, if you'd rather use hard numbers rather than dragging and dropping it in the preview video window.
- Size allows to articulate the specific size of the textbox, if you'd rather use hard numbers rather than dragging and dropping it in the preview video window.
Timeline
- Start time and end time allow you to enter mm:ss timecodes for the starting and ending points for when the hotspot will be visible manually, rather than having to use the yellow "curtains" above the timeline.
How to Delete a Hotspot
- If you're not already looking at the hotspot editor:
- Within Canvas, click "My Media" in the left navigation.
- Find the video in question and click the pencil icon on its row.
- Click "Launch Editor" in the gray box next to the video player.
- Click the icon that looks like an arrow inside a square.
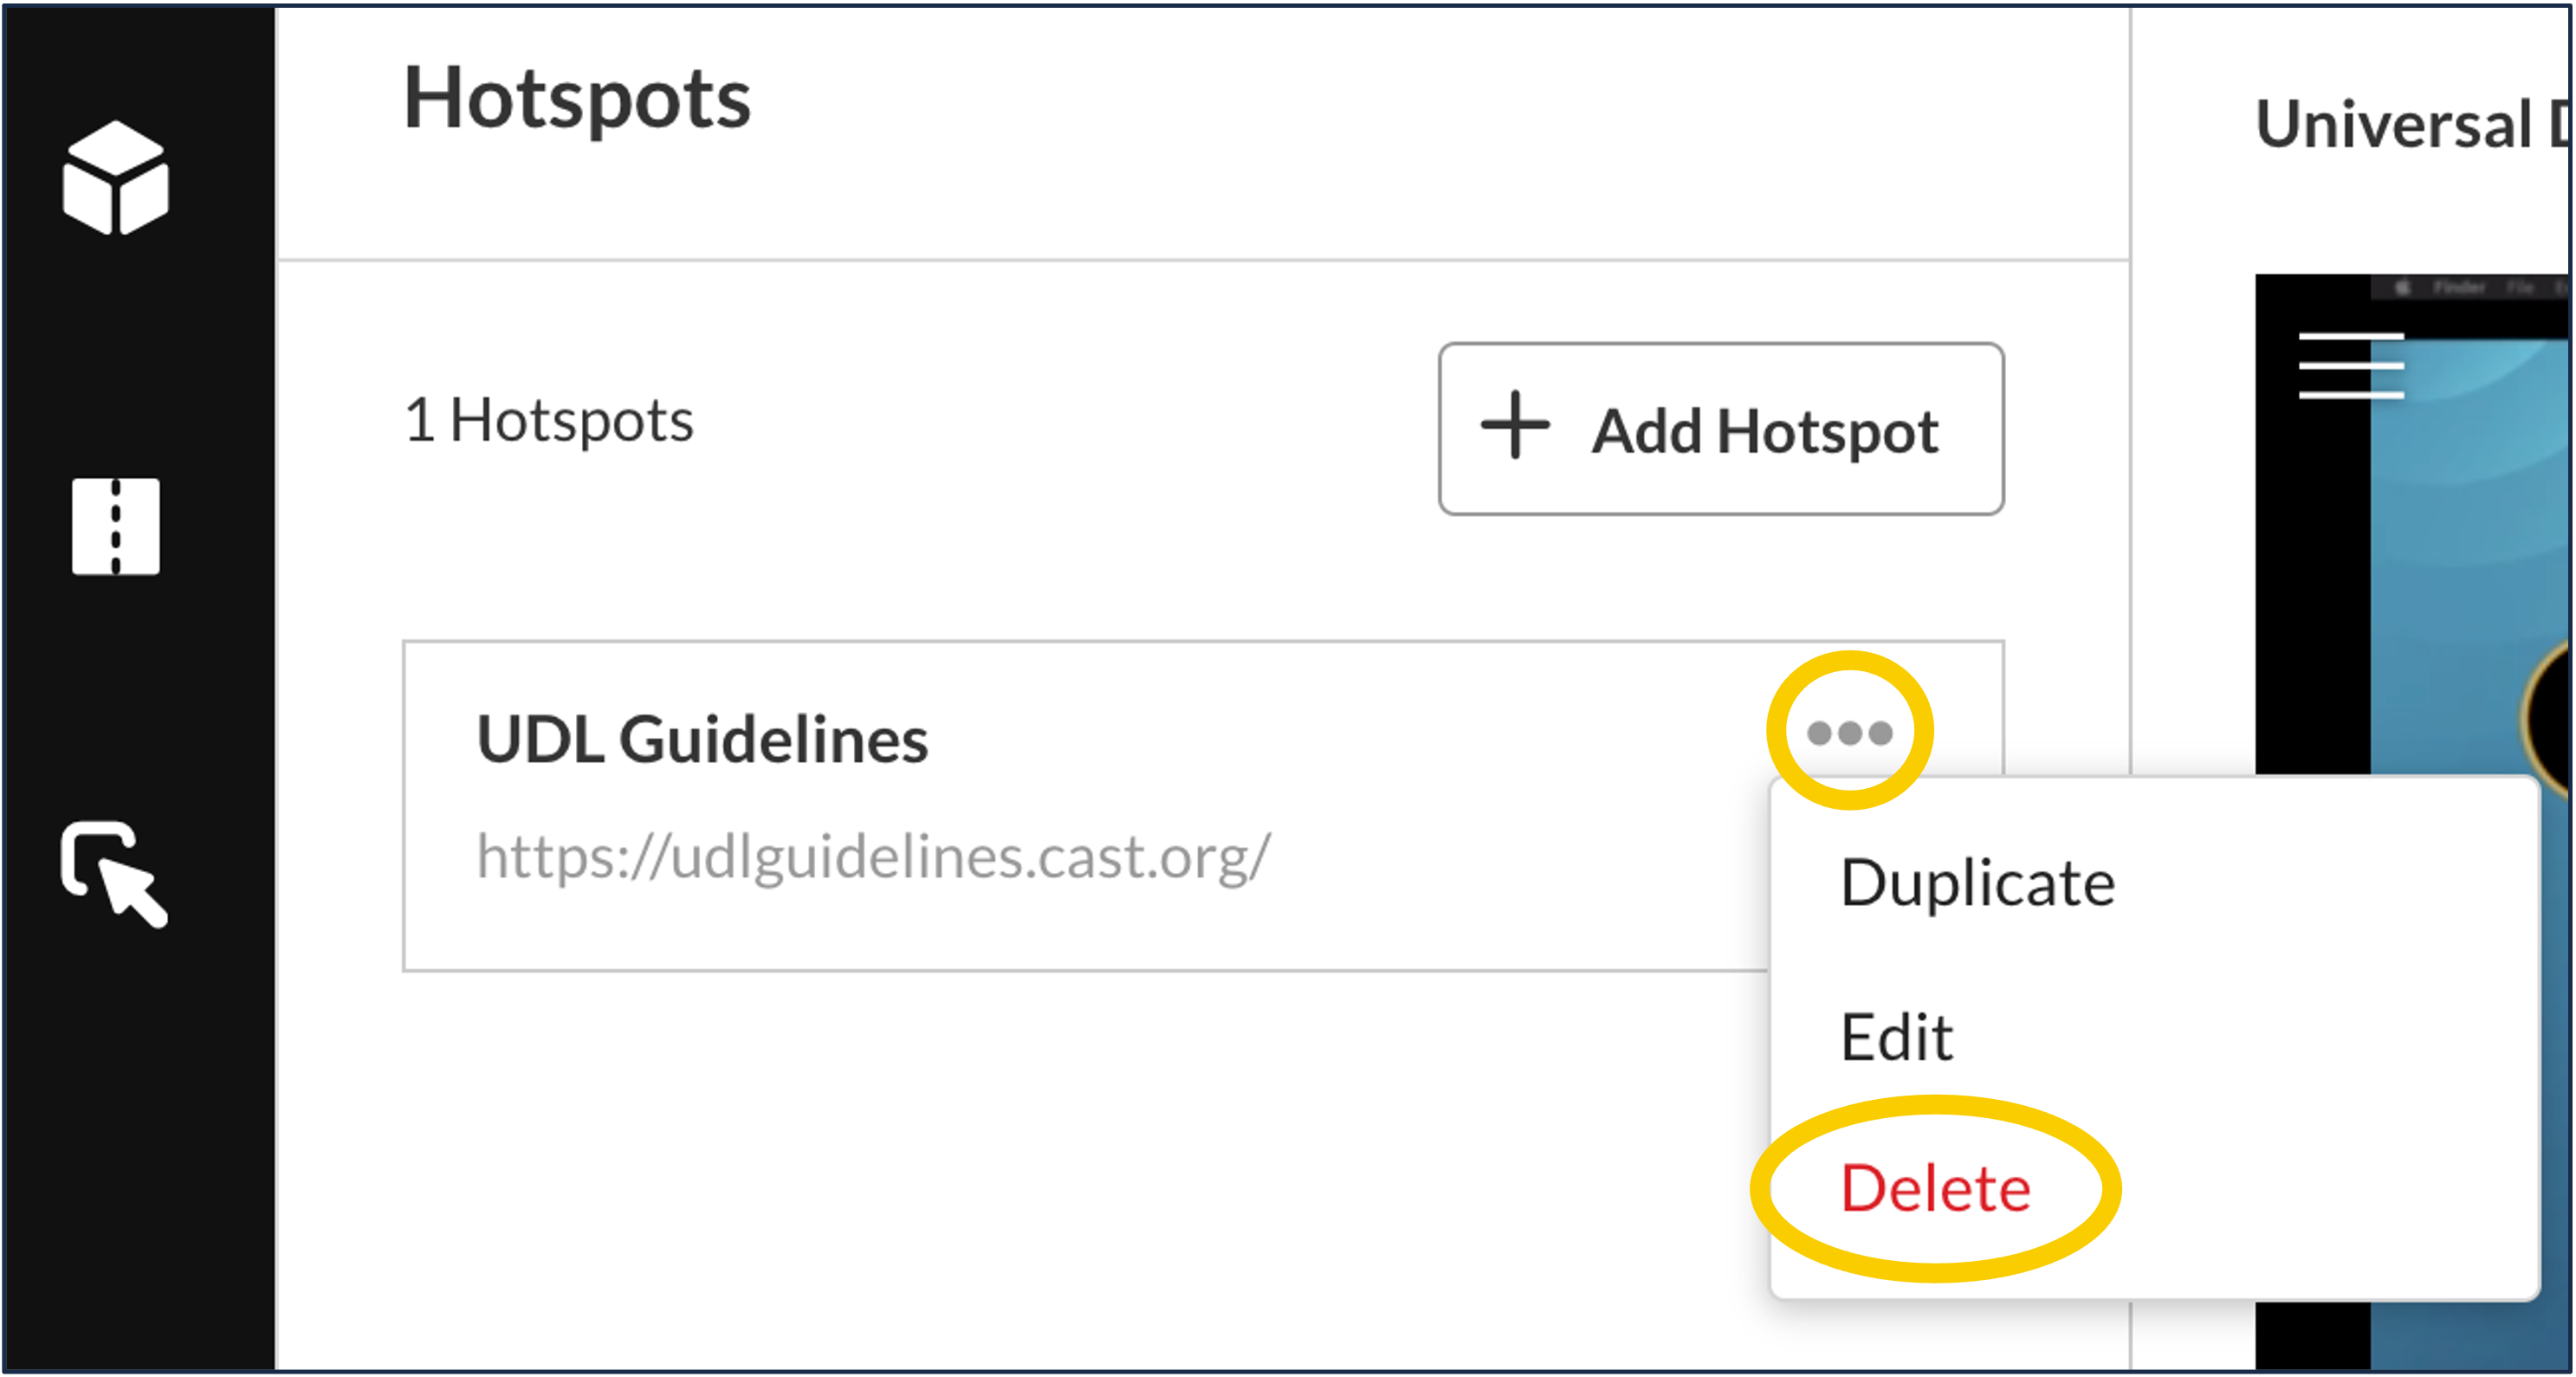
- You should see a list of all of the video's hotspots. Locate the one you want to delete and click the kebab on its row (the three dots). Select "Delete."
- Confirm that you want to delete the hotspot.
Have additional questions about video? Contact Multimedia Services at kaltura@ucsd.edu.