Chapters

Adding chapters to your videos can help chunk your content and make it easier to navigate and revisit. Here's how to add them to your videos in Kaltura.
Chapters allow viewers to jump to different parts of a video based on descriptors that you provide. While not as pedagogically effective as breaking up long videos into shorter videos, chapters can highlight the organizational structure of your material and allow students to more easily find information.
What is a Chapter?
A chapter is a time-coded marker you can add to a video's timeline.
Here are the basics about Kaltura chapters:
- When they're added, an icon will display in the upper left corner of the video player for viewers.
- Clicking the icon reveals all chapters for the video.
- Clicking any of the chapter markers will make the video jump to that spot.
- Chapters have a title, description, thumbnail, and tags.
- The data you add to it is searchable within the chapter menu.
- Videos recorded using Kaltura Capture that run a PowerPoint presentation will automatically generate chapter markers whenever a slide advances.
Adding Chapters
- Within Canvas, click on "My Media" in the left navigation.
- Locate the video to which you want to add chapters and click the pencil icon in its row.
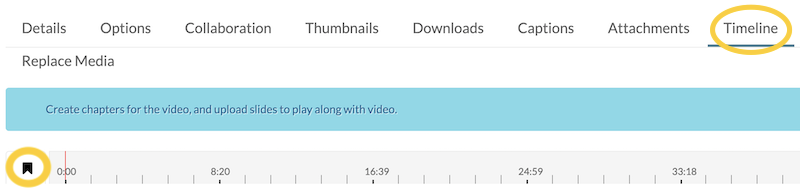
- Click on the "Timeline" tab below the video preview.
- Click the bookmark icon on the left side of the timeline. If you hover your mouse over it a small dialogue box will appear displaying the text "Create a new Chapter."
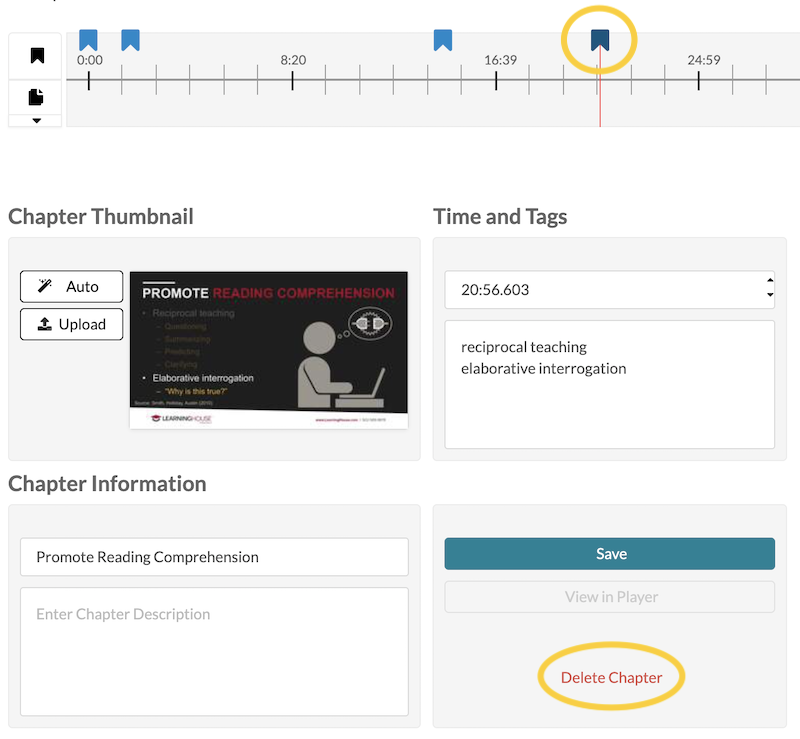
- Fill in the fields. See below to learn about the sections and individual fields within them.
- The Chapter Thumbnail section allows you to select or upload an image of what you'd like to appear behind the title and description of the chapter.
- Auto will choose the frame that's present in the video at the chapter's timecode.
- Upload allows you to upload your own image file.
- The Time and Tags block allows you to fine-tune the timecode of a chapter marker and add keywords that facilitate searches through the chapters.
- Use the timecode field to put the chapter marker exactly at the point you want it. (It can be tricky to get it exactly where you want it by playing the video or dragging the scrubber on the timeline.)
- The large text box allows you to enter search tags. When chapters display in the player, viewers have the option to search, so adding search tags may facilitate your students' ability to find relevant content.
- The Chapter Information block allows you to add a title and description for the chapter marker.
- The Chapter Title will be the first line of text that displays when students open the chapter menu in the player.
- The Chapter Description displays a few lines of text after the chapter title in the chapter menu in the player.
- The Chapter Thumbnail section allows you to select or upload an image of what you'd like to appear behind the title and description of the chapter.
- When you're done entering your chapter settings, click "Save" in the block in the lower right corner.
Deleting Chapters
- Within the "Timeline" tab in your video details, click on any of the chapter markers you've set.
- Scroll down to the bottom of the page and click the red "Delete Chapter" link.
Tips for Creating Chapters
Avoid creating chapter thumbnails that have text on them. If you upload a chapter thumbnail that has text on it, the chapter information that you add will end up on top of it, making it difficult to read. You may want to upload a simple colored background if the default chapter thumbnail has text on it.
Try using PowerPoint to make a chapter thumbnail. Create a widescreen presentation and design a slide that can be the background image behind your title/description.
Keep it short. Long titles and descriptions may get cut off.
Consider editing your chapters if you used Kaltura Capture. As mentioned earlier, Kaltura Capture will generate chapters automatically if you record a PowerPoint presentation. The information it pulls from your slides may end up looking a little wonky, though, so it's worth reviewing the information.