Types of Videos You Can Add to Your Course

Before you learn about how to add videos to Canvas, it's important to understand what kinds of video can be added to your Kaltura media repository ("My Media").
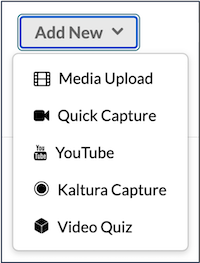
Kaltura provides UCSD with multimedia hosting and delivery and is integrated into Canvas, primarily through "My Media" and each course-specific "Media Gallery." There are six main categories of videos that you can add to your Kaltura media repository:
- Manually-uploaded media from your computer
- Quick Capture videos recorded using your web browser
- YouTube videos whose URL you paste in
- Kaltura Capture videos recorded using the Kaltura Capture desktop application
- Video quizzes that allow you to insert questions and reflection points into existing media entries
- Zoom cloud recordings that automatically end up in "My Media" thanks to a Zoom-Kaltura integration
- Podcasts from our lecture capture system, which automatically end up in the instructor's "My Media" and can also be configured to be automatically published to a Canvas course's Media Gallery
While you can also upload videos into the "Files" area in Canvas, we don't recommend this due to the limited disk space available to your course. (Note that this 4.3 GB limit cannot be increased.) With Kaltura, though, you're not subject to any file size or storage limits. In addition, videos within "My Media" can take advantage of a variety of Kaltura features, such as re-using videos across courses/quarters, sharing videos with colleagues, and analytics and quiz options, to name a few.
What to Know About Uploading Files to Canvas
- Storage limits: none. You can upload and store as much as you want.
- File size limits: none. You can upload gigantic files, though it may take a while.
- Multimedia support: Kaltura supports a wide variety of media formats. ("All common video, audio and image formats in all resolutions," according to Kaltura.) The Kaltura player also supports 360 videos.
- Privacy: unless you've signed a podcast agreement that dictates otherwise, all media added to "My Media" is private to you by default. You have to take additional steps to make them visible to others.
- Quality levels: after a file is added to "My Media," Kaltura will generate multiple lower-quality versions for that file behind the scenes (which they call "flavors"), for use by viewers in bandwidth-constrained areas.
- Data retention policy: if your video isn't watched at all for 2 years, the additional flavors that were generated will be deleted, although the source file will still exist. If your video isn't watched for 4 years, the entire entry will be deleted. See our page on the retention policy for more information.
- Machine captions: all media added to Kaltura after 13 June 2020 will have machine captions automatically added, typically within about 30 minutes after the file is done processing. These captions are about 70% accurate.
- Availability in MediaSpace: if you visit MediaSpace, you'll see the same "My Media" you do in Canvas. We have a separate set of documentation on MediaSpace, but you're able to do a few different things with your media there (such as allow viewers outside the university to see them and create channels).
All videos that are added to "My Media" are initially private (i.e. only visible to you) by default. You need to take specific steps in order to make them visible to others. As we discuss in our tutorials on presenting videos, there are two main ways of making videos visible to students in Canvas: by embedding them into pieces of instructional material within your modules (such as a Canvas "page"), or publishing them to the Media Gallery.