Creating a Course and Adjusting Settings in iClicker Classic
Learn how to setup a course in the iClicker software and adjust the course settings.
Alert
At the end of 2023, iClicker Classic will no longer be supported. All instructors who wish to continue using iClicker should plan the switch to iClicker Cloud for use no later than the beginning of Winter 2024 term.
Throughout this process, both iClicker and EdTech Support are committed to assisting you. The transition is designed to be simple, involving just four easy steps. For steps to transition, visit Before Class.
Download and install the iClicker software, then launch the iClicker application by double-clicking on the icon.
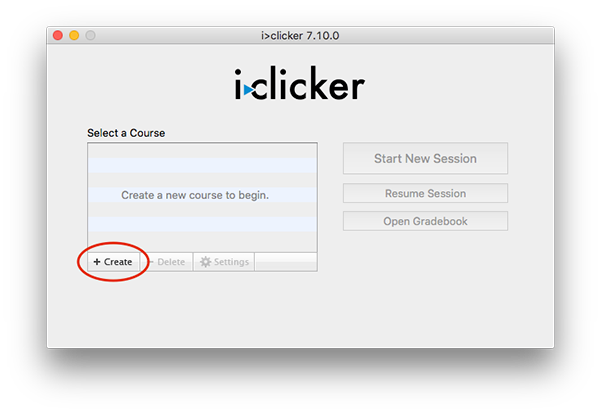
- The iClicker window opens with no courses listed. Click Create.
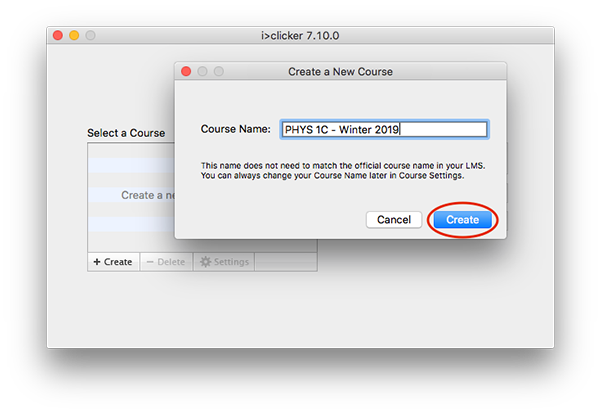
- A new course window appears. Enter your Course Name, including the term, then click Create. (Be sure to create a new class in iClicker for each term. If you teach multiple sections, it's usually best to create a course for each section. If you feel it would be better to combine sections into one course, please contact clickers@ucsd.edu to confirm.)
iClicker automatically creates a new course folder within the Classes folder in your iClicker folder.
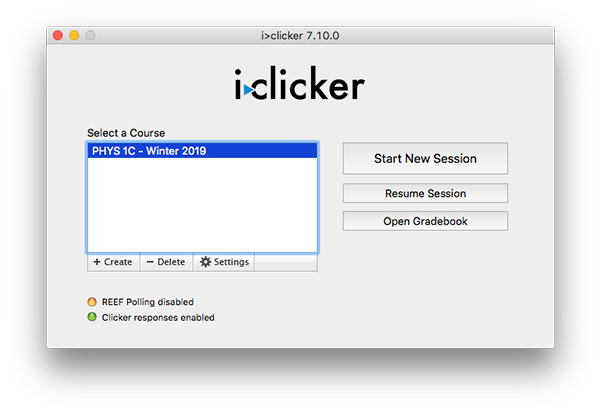
- You will be returned to the main iClicker window where you will see the course just created in the list of courses.
Repeat steps 1-3 as many times as necessary to create your courses.
Adjusting Course Settings
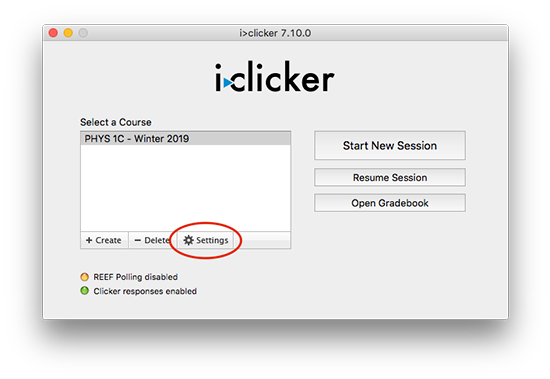
When you have an iClicker session open, settings can also be accessed from the iClicker Session Toolbar by clicking the Options button, then selecting Course Settings.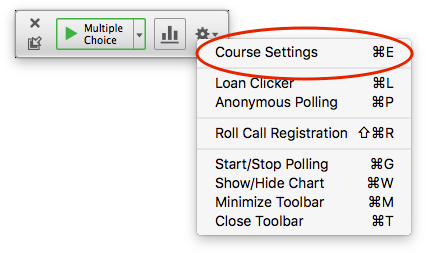
If you are doing the initial setup for a course, on the General tab of the Settings window enter the number under the barcode on the back of your instructor remote into the Instructor Remote ID box. (This number is also shown when you first turn on an instructor or student remote.)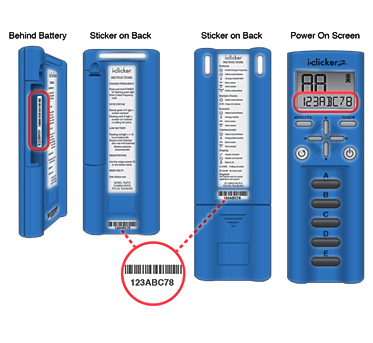
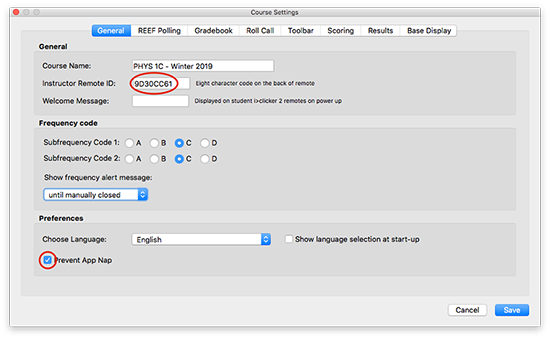
If you are a Mac user, be sure the Prevent App Nap box at the bottom of the General tab is checked.
Setting the Frequency Code in the iClicker Software
In the Settings area, under the General tab, choose the radio buttons to select your Frequency code.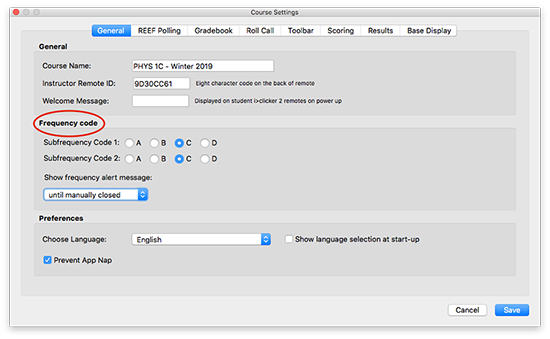
All base stations installed in lecture halls (and certain classrooms) across campus have a frequency code listed on the base station as a recommendation for you to use. This helps prevent "phantom" responses from students in other rooms who may also be using iClickers.
Reference the Frequency Chart below to see the frequencies recommended for base stations installed in lecture halls and classrooms.
For classrooms where you bring your own base station, you are welcome to choose any frequency. (The frequencies starting with “D” are probably the least likely to have conflicts.) If a nearby classroom is using the same frequency, at the session start-up an advisory will appear on your computer to use a different frequency.
Frequency Chart
|
Location
|
Code
|
Location
|
Code
|
|
|
CENTR 101
|
CA
|
PCYNH 106
|
CA
|
|
|
CENTR 105
|
AB
|
PCYNH 109
|
AB
|
|
|
CENTR 109
|
AC
|
PCYNH 121
|
BB
|
|
|
CENTR 113
|
AD
|
PCYNH 122
|
BC
|
|
|
CENTR 115
|
BA
|
PETER 108
|
AC
|
|
|
CENTR 119
|
BB
|
PETER 110
|
AD
|
|
|
CENTR 212
|
BC
|
PRICE THTRE*
|
CA
|
|
|
CENTR 214
|
BD
|
RBC AUD
|
CA
|
|
|
CENTR 216
|
CB
|
SOLIS 104
|
AB
|
|
|
CICC 101*
|
AB
|
SOLIS 107
|
CA
|
|
|
CSB 001
|
BA
|
WLH 2001
|
CA
|
|
|
CSB 002
|
BB
|
WLH 2004
|
AC
|
|
|
GH 242
|
AB
|
WLH 2005
|
AB
|
|
|
HSS 1330
|
AB
|
YORK 2622
|
AB
|
|
|
LEDDN AUD
|
CA
|
YORK 2722
|
CA
|
|
|
MANDE B210
|
AC
|
|||
*Bring your own base station
Important: In order for faculty or students to change frequency on their remotes, the desired course must be highlighted in the main iClicker window or the session must be started.
Read the instructions to set the frequency on iClicker remotes.
Scoring
The Scoring settings allow you to establish the point values that students earn for actively participating in class and for answering questions correctly.
Important: Any changes made to the Scoring settings apply only to new polling sessions. Make adjustments to past sessions using the Gradebook.
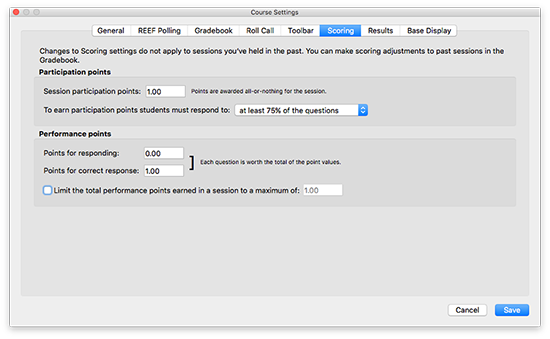
Set the participation points options
The iClicker software awards participation points to students who attend and vote during lecture (encouraging student engagement). The software awards participation points by overall session activity, not by individual question.
- Set the criteria to receive the participation points. To earn the session participation points, students must respond to a certain percentage of questions in a session. Depending upon the total number of questions, iClicker automatically calculates the minimum number of responses needed. Example: If you select the "all but one question" option and there are 10 questions in a session, a student must respond to at least 9 of the 10 questions (correctly or incorrectly) to earn the participation points.
Set the performance points options
The software awards performance points to students by question for specific answers. Students can earn performance points without earning participation points, depending on your preference.
- Enter the points the student receives for responding to a question. This option allows you to enter the default number of points students receive for any answer. These are different from participation points in that they reward students for performance by question, whereas participation points reward students for participation by session.
- Specify the points awarded for a correct response. This field allows you to reward students for choosing the correct answer for a question. These points are earned in addition to any performance points you award for simply answering the question.
- Set a limit on the total number performance points a student may earn in a session. Example: if maximum performance points are set at 5 points, and a 10-question session is held with each question worth 1 point, even if a student answers all 10 questions correctly, the most he or she can earn for that session is 5 points.
Enabling iClicker Student Mobile App Settings
If you are going to enable iClicker Student, instructions for setting it up are at this iClicker support page.
Alert
Per iClicker, student participation with the mobile application will not be available for iClicker Classic starting at the end of 2023.
Next Topic: Canvas Integration >